I heat up my sauna perhaps 200-250 times a year. My barrel sauna came up with a Harvia KIP 6kW stove. After about 400 heat cycles, one of the coils failed. Luckily spare parts are available and replacing the coil is not all that difficult. A new coil costs about $80 and there are three coils in that stove. However, a few months after the second coil blew up and a few months after, the third one.
To my surprise, the build quality of that Harvia stove wasn’t that great. It had rusted somewhat. Some research showed that failing coils are not that uncommon and sauna-goers have had issues with other brands too.
I started thinking of getting a new stove. Unfortunately, manufacturers are charging arm and leg for new stoves in the U.S. A brand new Harvia KIP goes for about $900. Similar stoves cost about $250 in Finland, if that.
One thing I noticed with Harvia KIP was that it was actually made in China. A friend of mine had actually replaced his stove with a Vevor stove, also made in China. His sauna did not burn down and everything seemed to be working just fine, so why not give it a go.
Why Vevor?
I must admit that I decided try this Vevor stove for three reasons:
They advertised that their coils are made of stainless steel. Unfortunately coils used by many mainstream brands are not made out of stainless steel.
I find it difficult to pay $900 for a $200 mass-produced product. Just because I know the stoves are overpriced in the U.S., I decided to sacrifice löyly experience in the altar of providing the vivid U.S. sauna community a new POV.
I figured that the worst case, the stove fails quickly or does not deliver good steam. Not too expensive experiment either way.
Ordering and shipping process
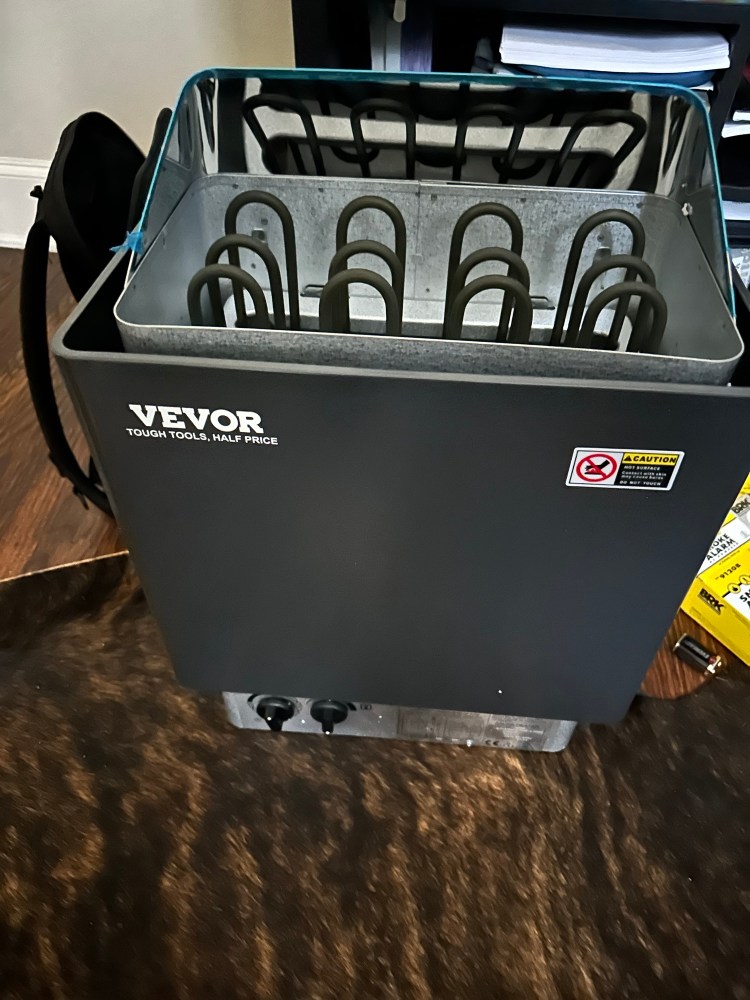
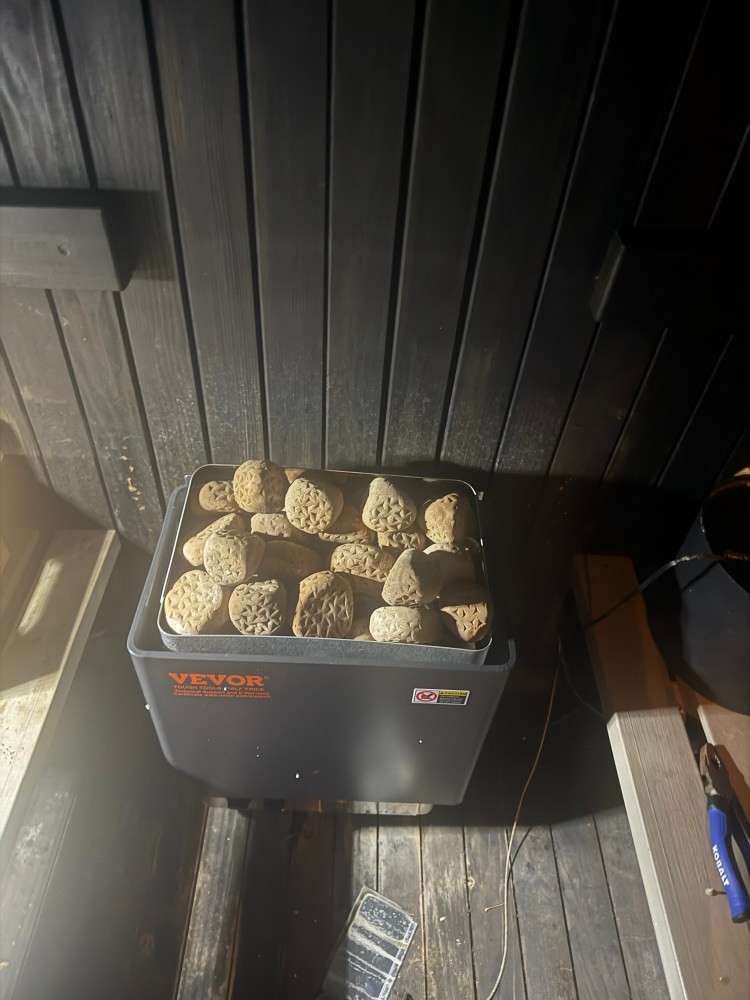
I ordered a basic 6kW Vevor stove from their website. The cost was $140 including sales tax and shipping and the delivery arrived in four days from order. At a first glance, the stove looked very similar to any basic 6kW stove: timer and power controls in the front, three coils, and a mandatory sticker telling that the stove might get a bit hot. Vevor marketing team beats other brands 6:0 with their slogan: tough tools to your sauna everybody!
I noticed one key difference to Harvia KIP though: the rack preventing stones from falling too low was placed much higher in this stove. In Harvey, that rack is about 4 inches lower. It seems though that you can lower the rack if you want. I paged through the manual and decided to leave it where it is. I know that this would mean less stone capacity, but let’s play by the rules.
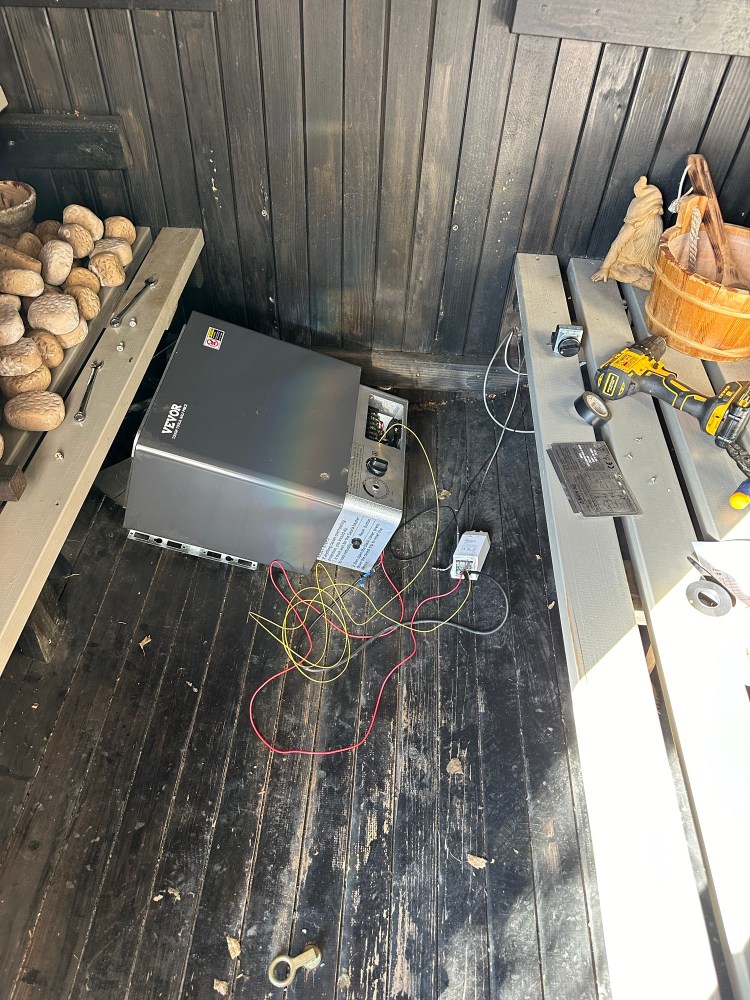
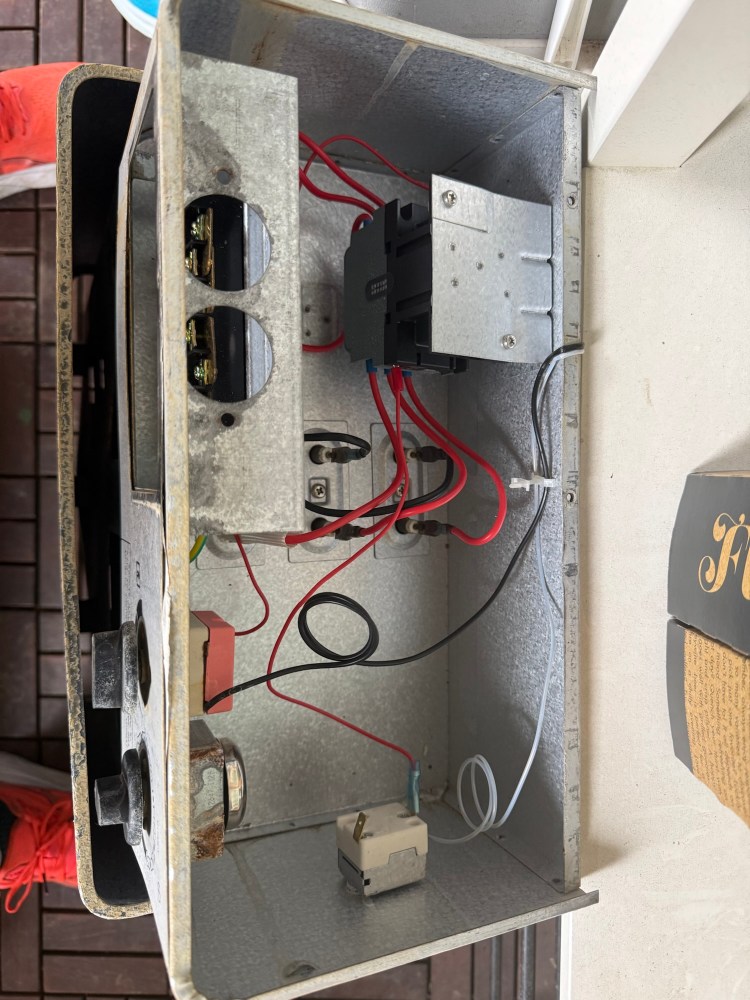
Wiring the new stove was very straight-forward: two lines in and ground. It was also quick to figure out the rest of the logic: one line in to the timer clock and another out, same for the power adjustment, and then third line to the breaker. The contractor was very similar to what I had in my Harvia stove so all the wiring made sense. The picture below looks a bit chaotic. I don’t think anyone in their right mind would consider replacing the manual pomodoro-like timer with a WiFi switch…
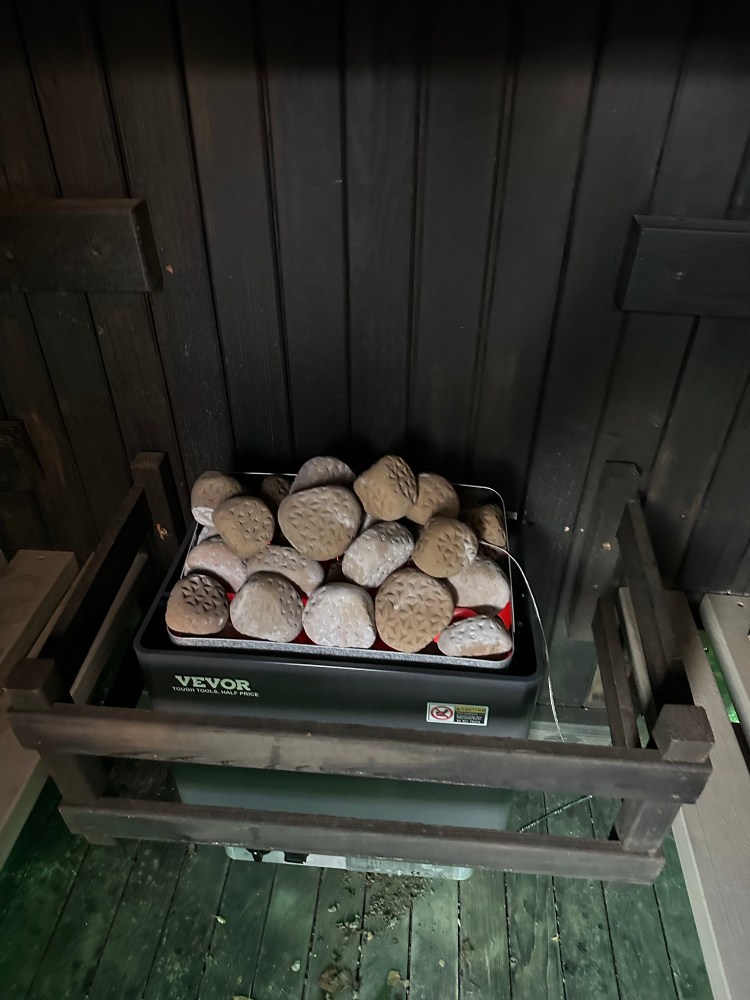
After maybe an hour or so, the new stove was installed and heating up. I use ceramic stones in my sauna and I think this Vevor absorbed about 15 kilos of them whereas Harvia would take about 20 kilos.
The löyly experience
The heat up time in this Vevor is slightly faster than in Harvia. I think it might be because there are fewer stones so the air circulates better. The difference is minimal though: I’d say that Vevor gets ready in about 30 minutes and Harvia took maybe 10 minutes more.
Techy as I am, I have also measured the difference in air humidity after the stove switch. I cannot really say there is any: both Harvia KIP and this Vevor provide similar steam (löyly) and the absolute humidity hits over 100g/m3 (see the Humidity and Löyly Index and Improving Ventilation in a Barrel Sauna articles if you want to understand more).
Experiences after 100+ heat cycles
As I am writing this blog in June 2024, I have heated up the Vevor stove a little over 100 times. It is not yet fair to conclude anything on the durability of the stove or the coils.
The first heating element fails after ~400 uses
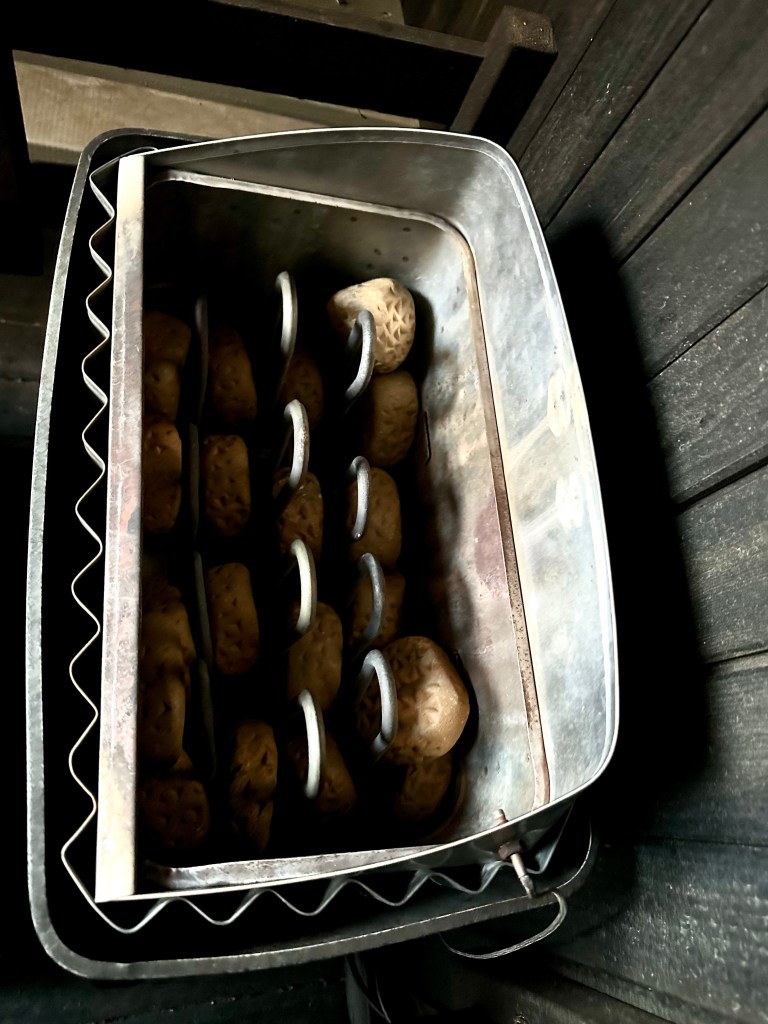
Quite precisely after two years and ~400 uses, the middle element failed. It seemed that the metal sheath of the element had burned through. Very similar failure that I had seen with my previous Harvia stove.
Otherwise, the stove looked good as new: no signs of rusting:
I could not find spare heating elements easily, so I decided to replace the entire stove. The new one looked identical. Only the color of the badge had been changed from white to orange, but luckily one of the best slogans for any sauna brands was kept 🙂
Now I have two elements from the old stove as spare parts, but assuming that this new stove also lasts about ~400 uses, I’d say that Vevor is good value especially here in the U.S. where European stove brands are so extremely marked up.
Ceramic sauna stones are rather popular in public electric saunas in Finland nowadays. The main reason is that they are more durable and that they extend the lifetime of the heat elements.
I have now used them for about 50 heat cycles in my sauna and I can recommend using them especially in small electric saunas. Below are the pros and the cons and then, as always, lengthy discussion about the subject.
Pros:
Much easier to install than regular stones: won’t bend the elements
The stones heat up about 20% quicker to target temperature
No dust on floor and cleaner air
Minimal maintenance
Extends lifetime of heating elements
Better löyly
Cons:
About 5x more expensive than regular sauna stones
The stones cool down faster after pouring water on them
Difficult to buy in the U.S.
Less traditional looking
Acquiring Ceramic Stones
After vigorous 10 minutes if googling, I found out that nobody was selling ceramic stones in USA. There were a few online stores that would ship to USA, but the delivery times seemed to be months and the shipping fees were $150-200. That is a bit too steep for a $100 product.
However, my hugely popular blog has attracted fans from all over the world, including Pekka from Pönttöpalvelu. Pekka is an active volunteer in multiple sauna associations in Finland and he was also one of the steering group members in the “Sauna culture in Finland” to Unesco’s Cultural Heritage list campaign in 2020.
Pekka’s business focuses on all kinds of sauna related stuff and he happens to sell Kerkes ceramic stones. So, I contacted Pekka and asked him to ship 20 kilos of these goodies to my brother’s place in Tampere.
I then figured that we would have a business meeting in Portugal and some of my Finnish colleagues would be traveling there , I might as well just ask a little favor and ask someone to bring me some sauna accessories. Little did my colleague know that he actually signed up to bring a 45-pound box. As he checked the box in at the airport, the airline personnel wasn’t sure if ceramic rocks were on the same list of restricted items with lithium batteries and moonshine. Turns out, that transporting rocks in checked in luggage is ok.
Ceramic stones seeing the world in Lisbon
The cargo made it successfully from Tampere to Lisbon, but on my return journey to Dallas, I found out that the box could not withstand gentle handling of luggage. As I was changing planes in Madrid, airport personnel entered the plane before takeoff and asked if I had some rocks with me. They said that many of those stones now decorate the runway but they collected as many as they could find and re-boxed them. In Dallas, I found out that maybe one fourth of the stones made it to the Lone Star State. American Airlines generously reimbursed the damage, but overall this transportation saga was a bit bummer. Later, I thought that passengers next to me were probably a bit confused when they heard that bro is hauling rocks in his luggage like some archeologist.
Only about 10 lbs of the original 45 lbs made it to Dallas on first attempt
Luckily, I had my next Finland trip planned for a few months later and Pekka agreed to wrap the box better this time. No issues this time.
Installation
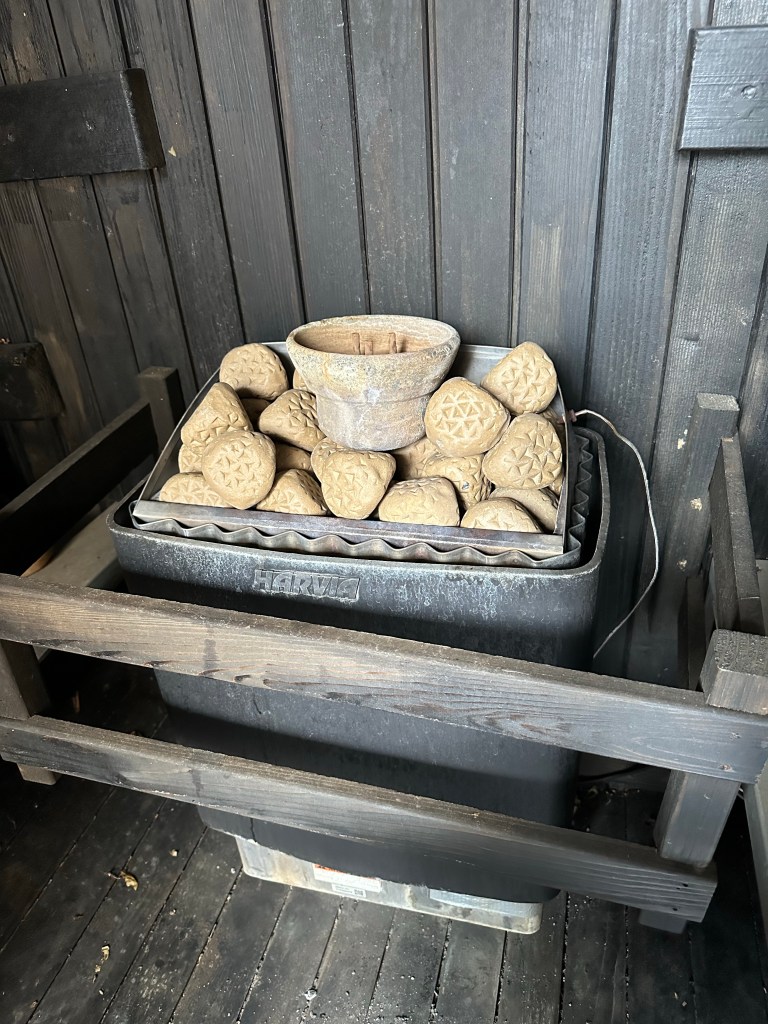
You can order ceramic stones in a few different shapes and sizes. With good planning, you can get exactly the right sizes and shapes to fit between the elements without bending them.
Piling ceramic stones is easy due to the consistency in shape and size.
The Kerkes stones aren’t mimicing regular stones in color or shape. It is subjective, which ones look aesthetically more pleasing.
Ceramic Kerkes stonesRegular stones
Heating up and löyly features
I have found out that I get ideal steam in my sauna when the rocks reach temperature of about 250 C. I have placed a thermometer that touches one of the top stones and based on that data, it seems that ceramic stones heat up about 20-25% faster than regular stones. This is relevant for a two reasons:
My sauna gets to 50c before heating on hot summer days in Texas. With ceramic stones, I get the sauna bathing ready quicker and so that the room temperature doesn’t increase to unbearable.
Shorter heat-up means lower energy consumption and, at least theoretically, fewer operating hours of the stove.
Ceramic stones heat up quite linearly 7C per minute in my saunaRegular stones heat up approximately 5C per minute in my sauna
I would also say that it takes more water to create the same steam in my sauna now. The steam (löyly) itself is softer and more to my liking that way. It seems that absolute humidity is a bit higher on average during my sessions now than before, probably because I use more water.
Maintenance
Kerkes stones come with a five-year warranty for home use. In Saunologia’s test the ceramic stones also crumble eventually, but much later than regular stones.
What I have found is that I no longer have any stone dust on the floor, which is nice. This probably also means cleaner air in my small sauna.
With regular sones, I’ve found that I had to replace about 20-25% of the stones every year. Moreover, that stone dust from crumbled stones gathers around the heating elements, which kills them faster. I lost one heating element after maybe 400 uses. Interesting to see if these new stones mean longer lifetime for the elements. It should.
Conclusions
If you can get ceramic stones at a reasonable price point, I would definitely go for them. If you have pillar stoves with 100 kgs or more stones, or a big smoke sauna, the replacement cost gets high and it might be difficult to justify the cost.
The steam in small electric saunas tends to be harsh and ceramic stones are an inexpensive way to improve make the steam gentler and allow you to use more water and thus increase humidity in the room. Using ceramic stones also allows you to heat up the rocks without getting the room too hot. Many sauna users especially in the U.S. seem to be obsessed to get their saunas to 200F and even above like the higher temperature would automatically improve the experience. In my sauna, the sweet spot is around 65-70c (150-160F). At that temperature, I can add plenty of steam and use whisks.
My brother and his wife heard about this sauna concept a few years ago: a vault-shaped underground smoke sauna made of cylinder blocks.
So they called the manufacturer and asked for a demo as they happened to be driving in that part of Finland. The owner could not make the demo at their showroom but offered to heat up the sauna at his home instead. He had even bought sauna beers and sausages!
Turns out that the owner Jari had heard stories from his dad about the underground dug-out saunas during WW 2 so he decided to develop something similar: first a cellar sauna and then these vault saunas. To be fair, the dug-out saunas during the war were quite different than this one but let’s leave reviewing that sauna type for another time.
The concept
The idea of building saunas underground is pretty unique but not unheard of. In fact, all kinds of cellar saunas were and still are typical in Finnish apartment complexes and houses. One benefit of the underground saunas is higher humidity.
This manufacturer sells underground saunas with continuously heated stoves and with smoke sauna stoves (or ovens as they call them). This article reviews the smoke sauna configuration.
Smoke saunas do not have chimney so they are sometimes also called chimney-less saunas. While the idea in most saunas is to keep the stove and the stones warm by keeping the stove on while using the sauna, smoke saunas are very different. The idea is to heat up a bunch of stones (300 kilos or 650 pounds in this case). After heating up the stones, the fire is killed and carbon monoxide in the sauna room is ventilated out before using the sauna. This is quite important if you want to use this sauna type for more than one time in your life..
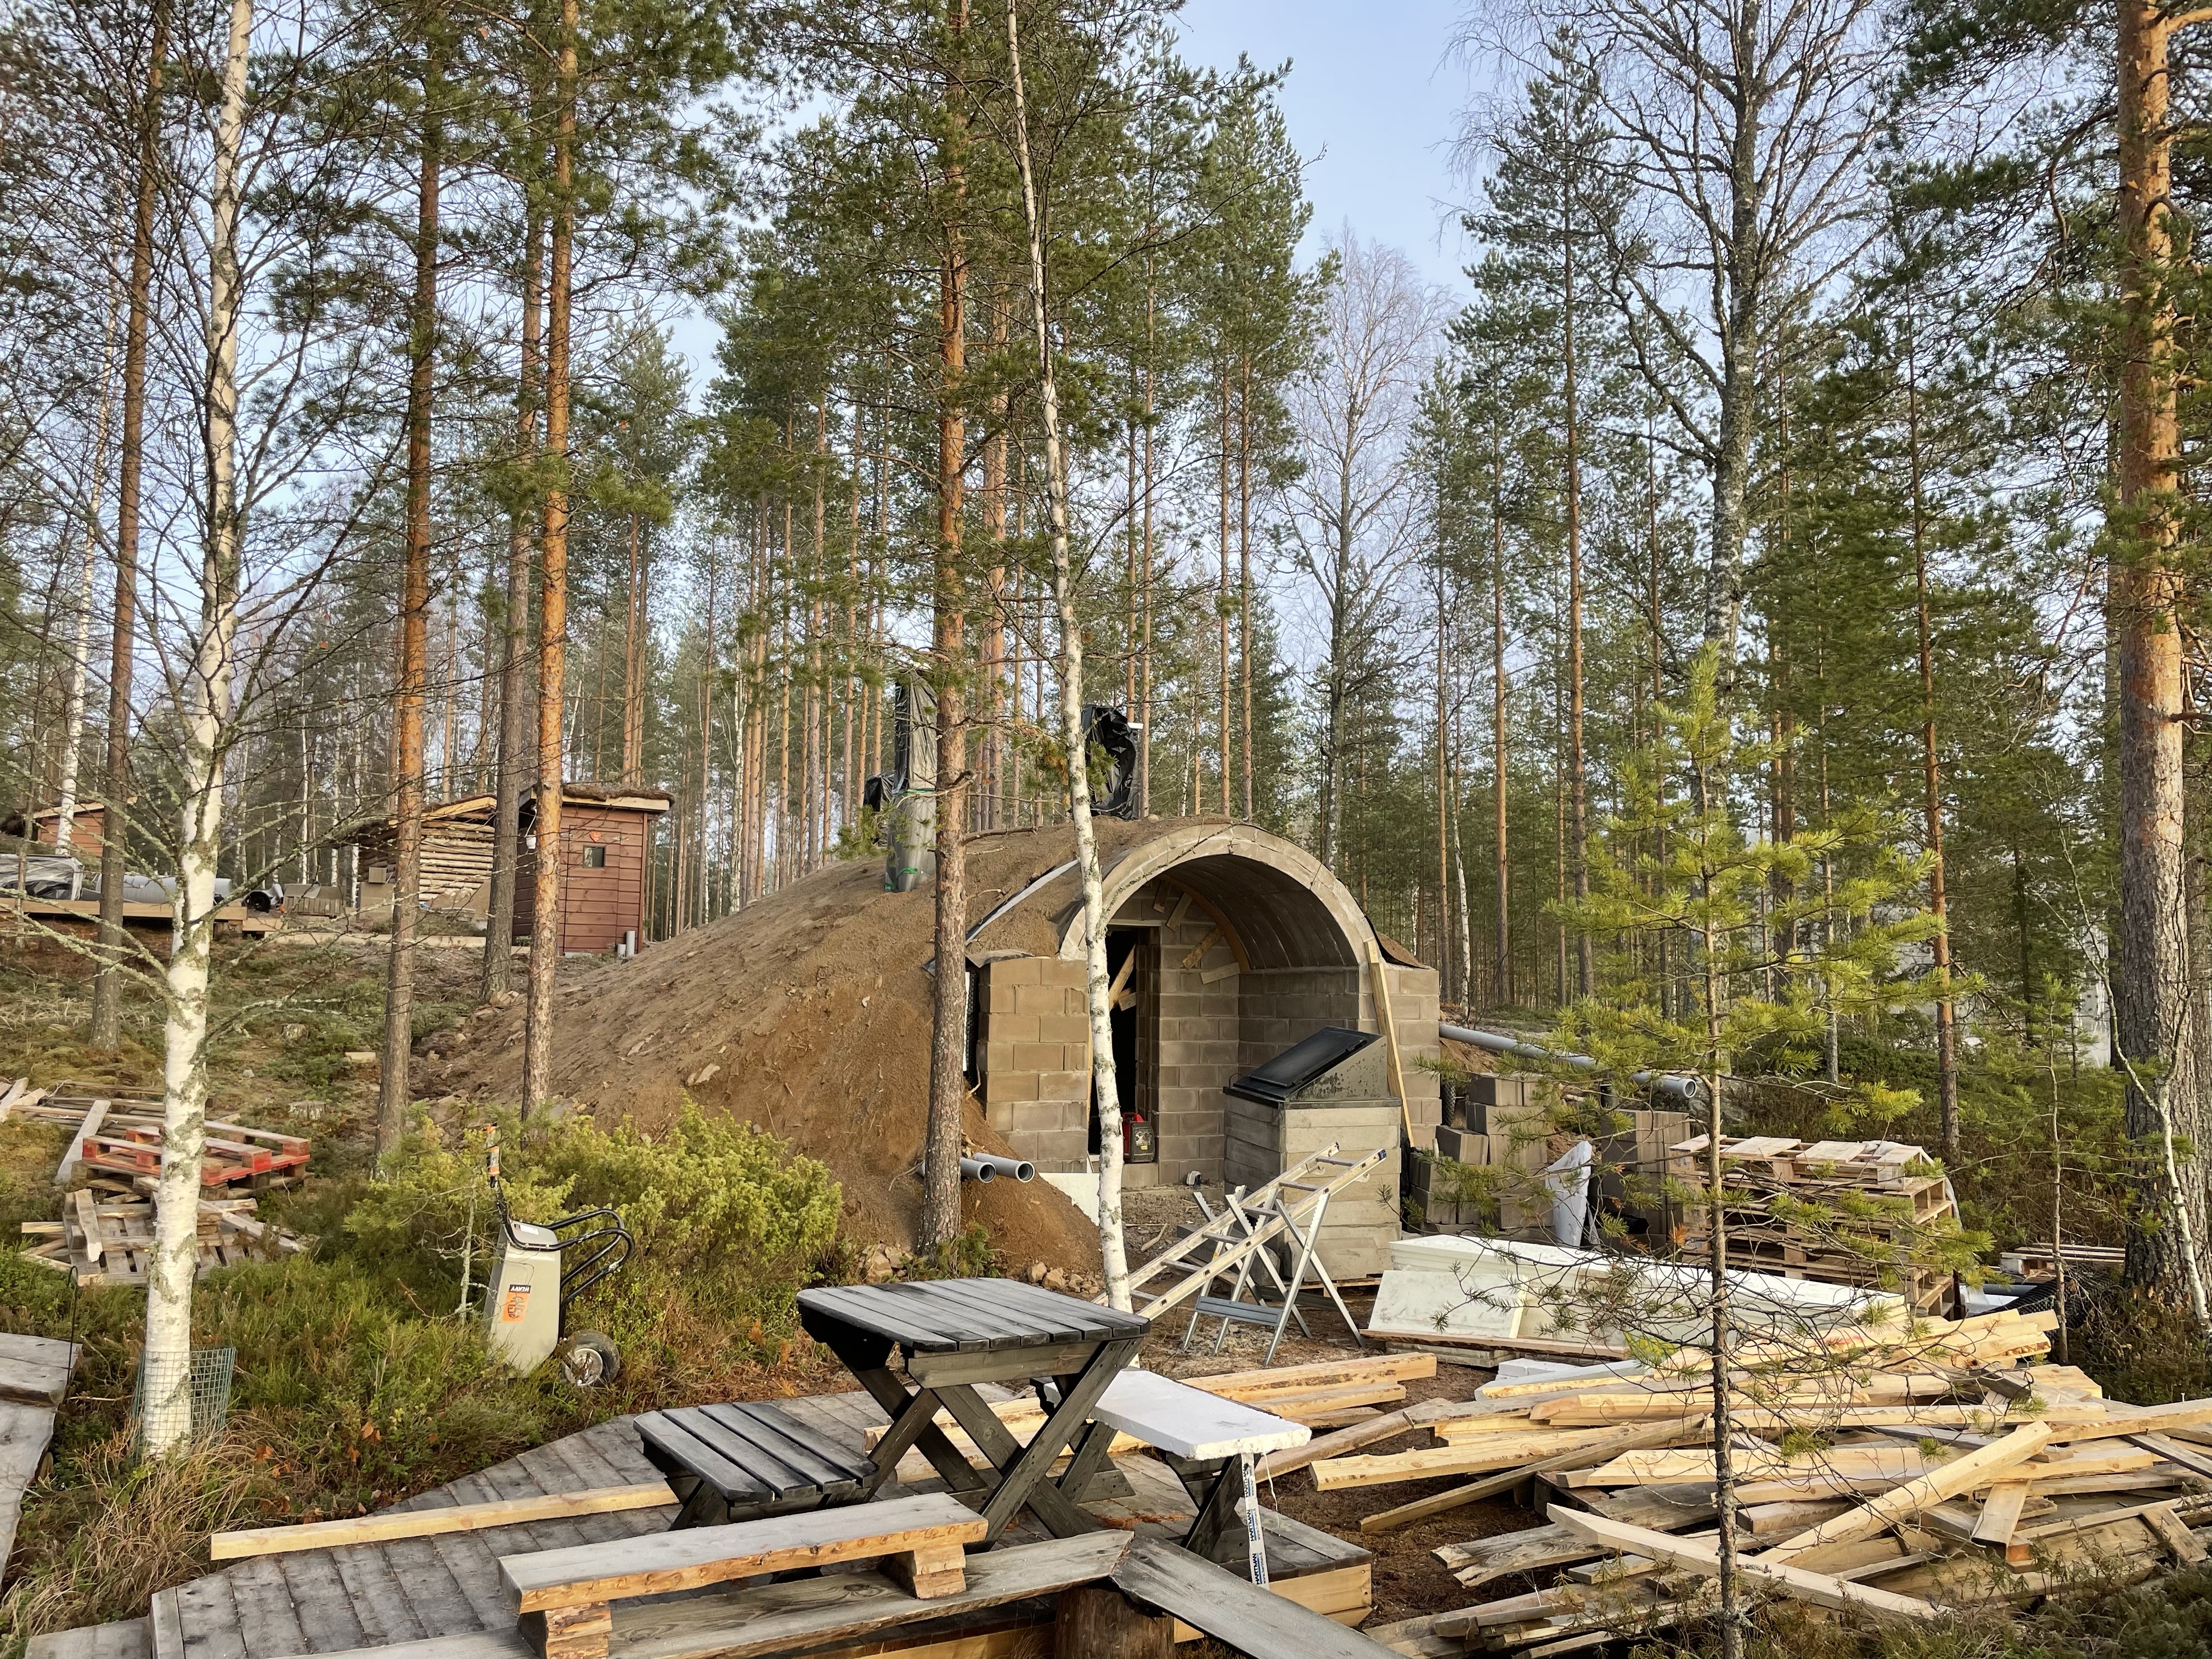
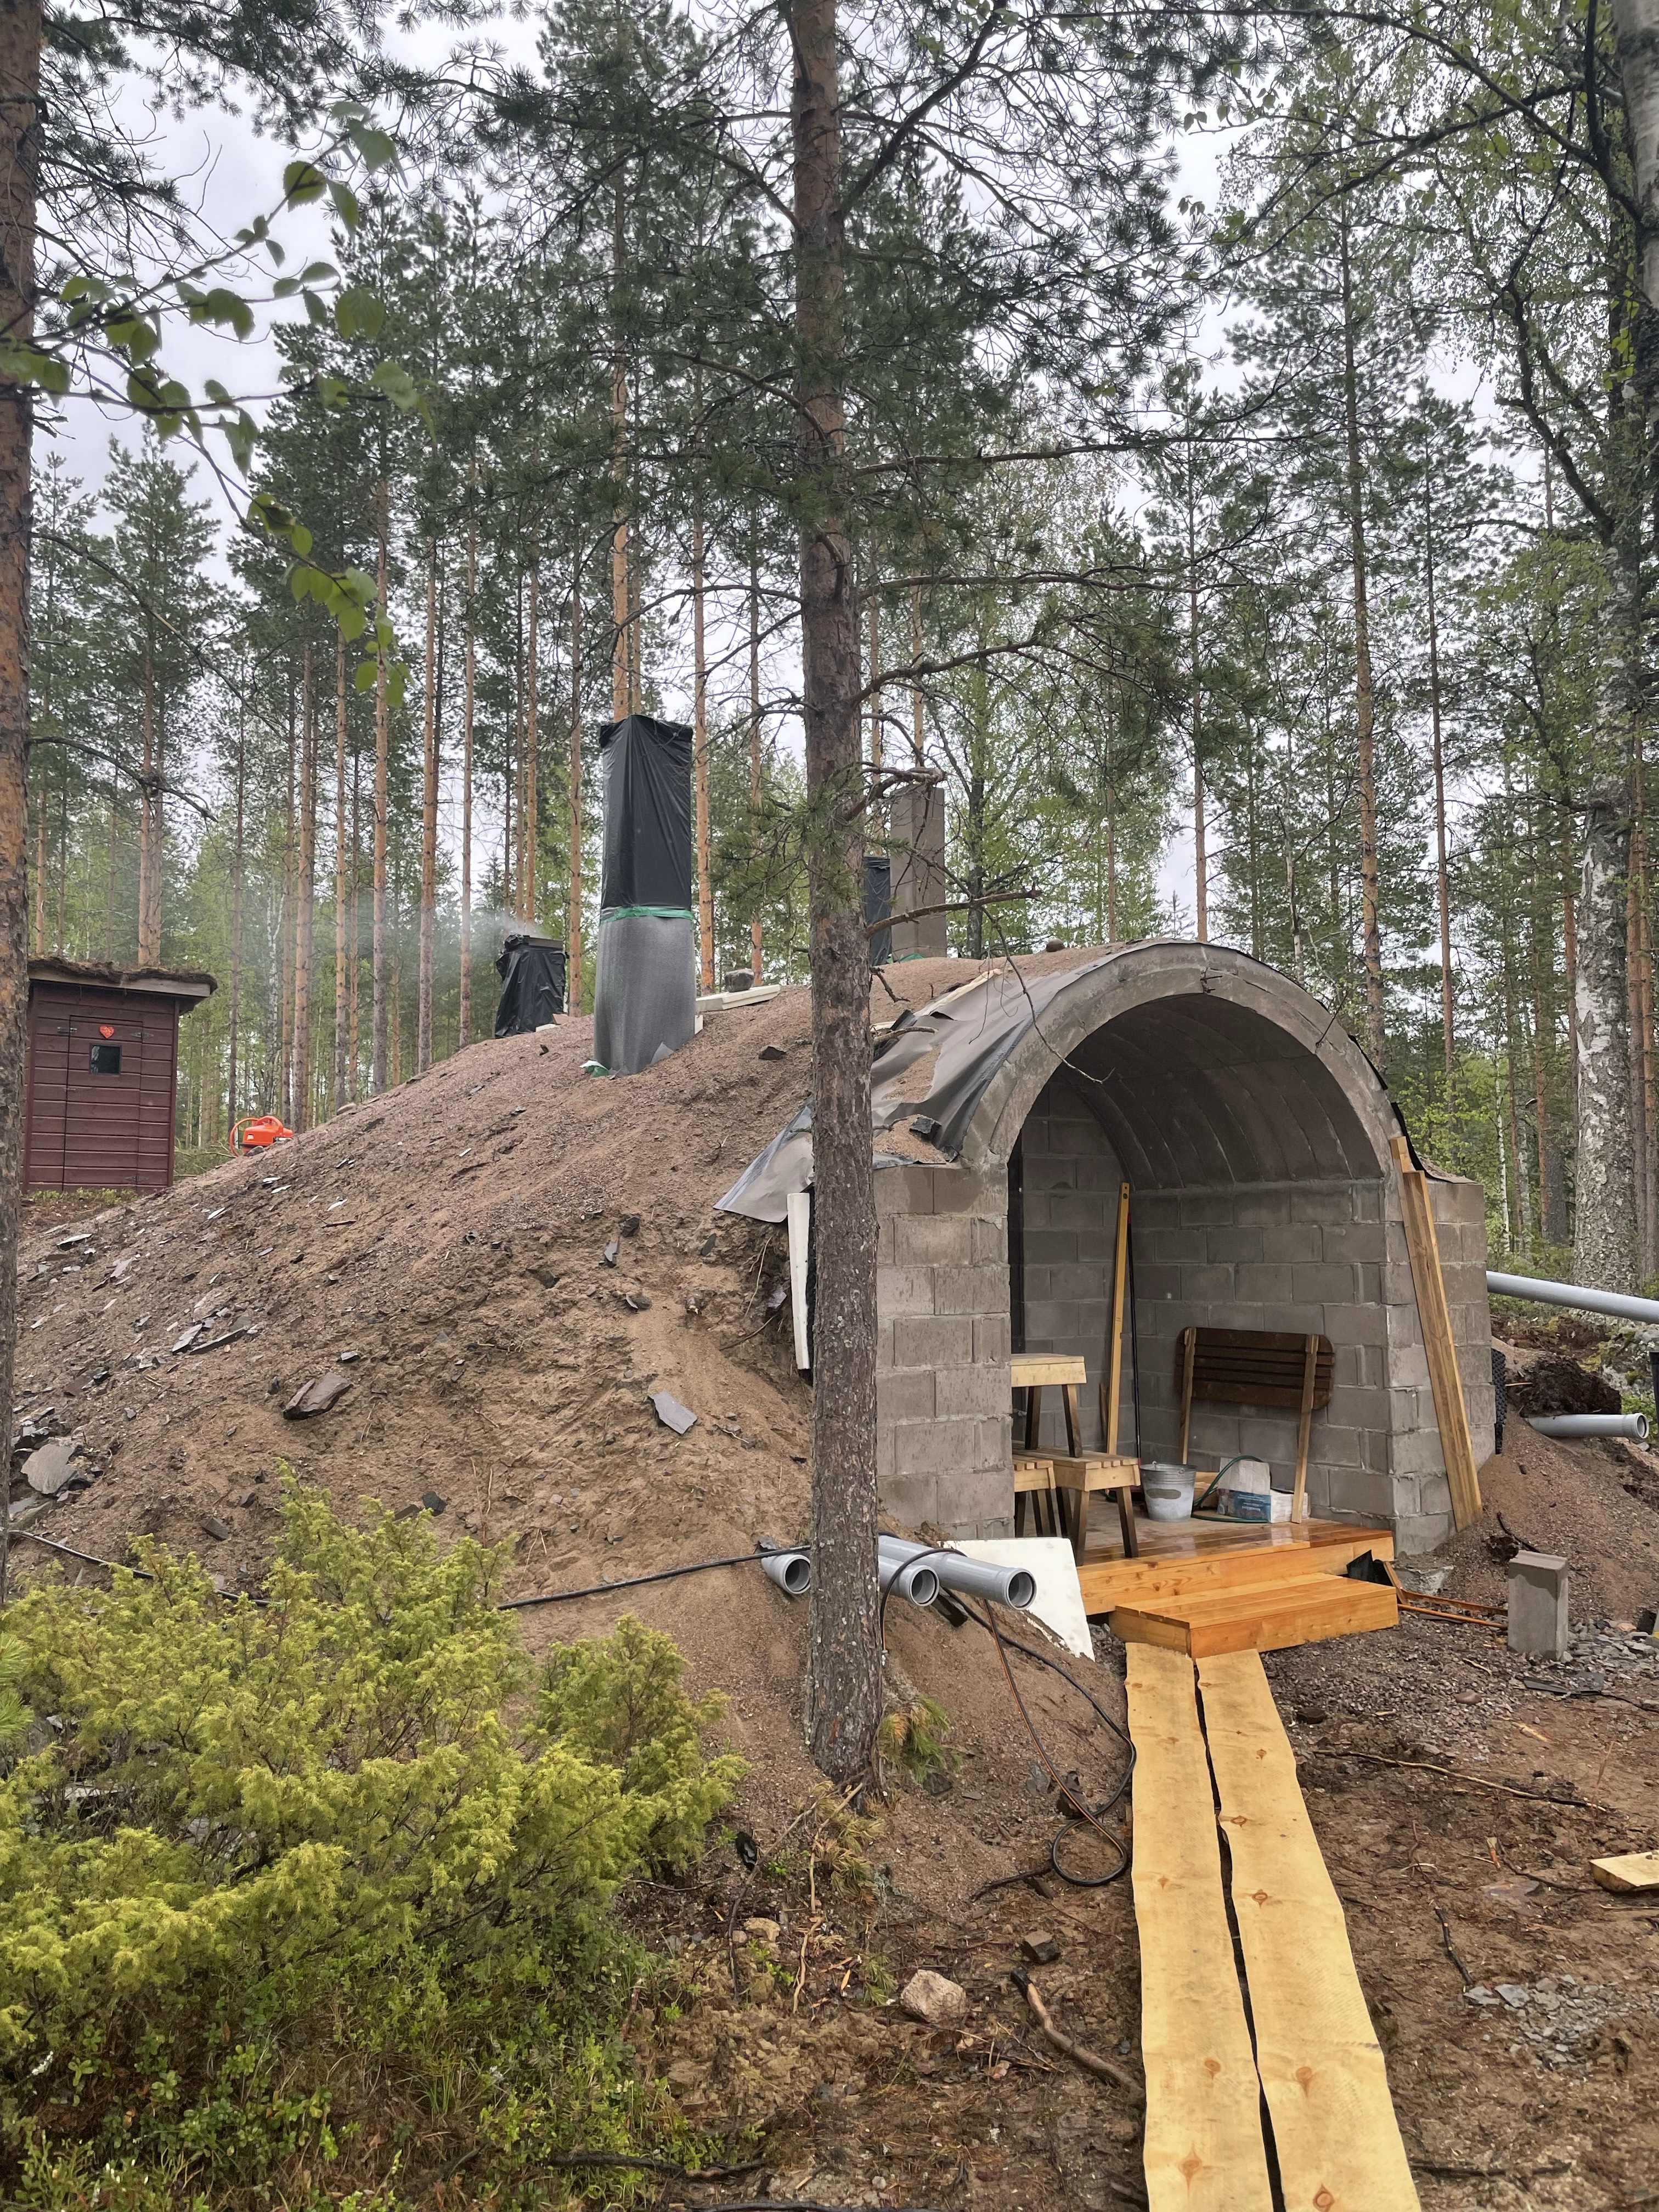
What then makes this particular smoke sauna different is the shape and the material: it is underground, made of cylinder blocks, and the ceiling is semi-circle-shaped vs. flat. The underground structure keeps temperature and humidity more constant in winter and summer. Cylinder blocks are fireproof, which is a plus considering how easily Finnish smoke saunas burn down – some sources say that these saunas last on average six years. So this one won’t burn down. According to the manufacturer, the benefit of the semi-circle ceiling is better rotation of the steam.
Construction
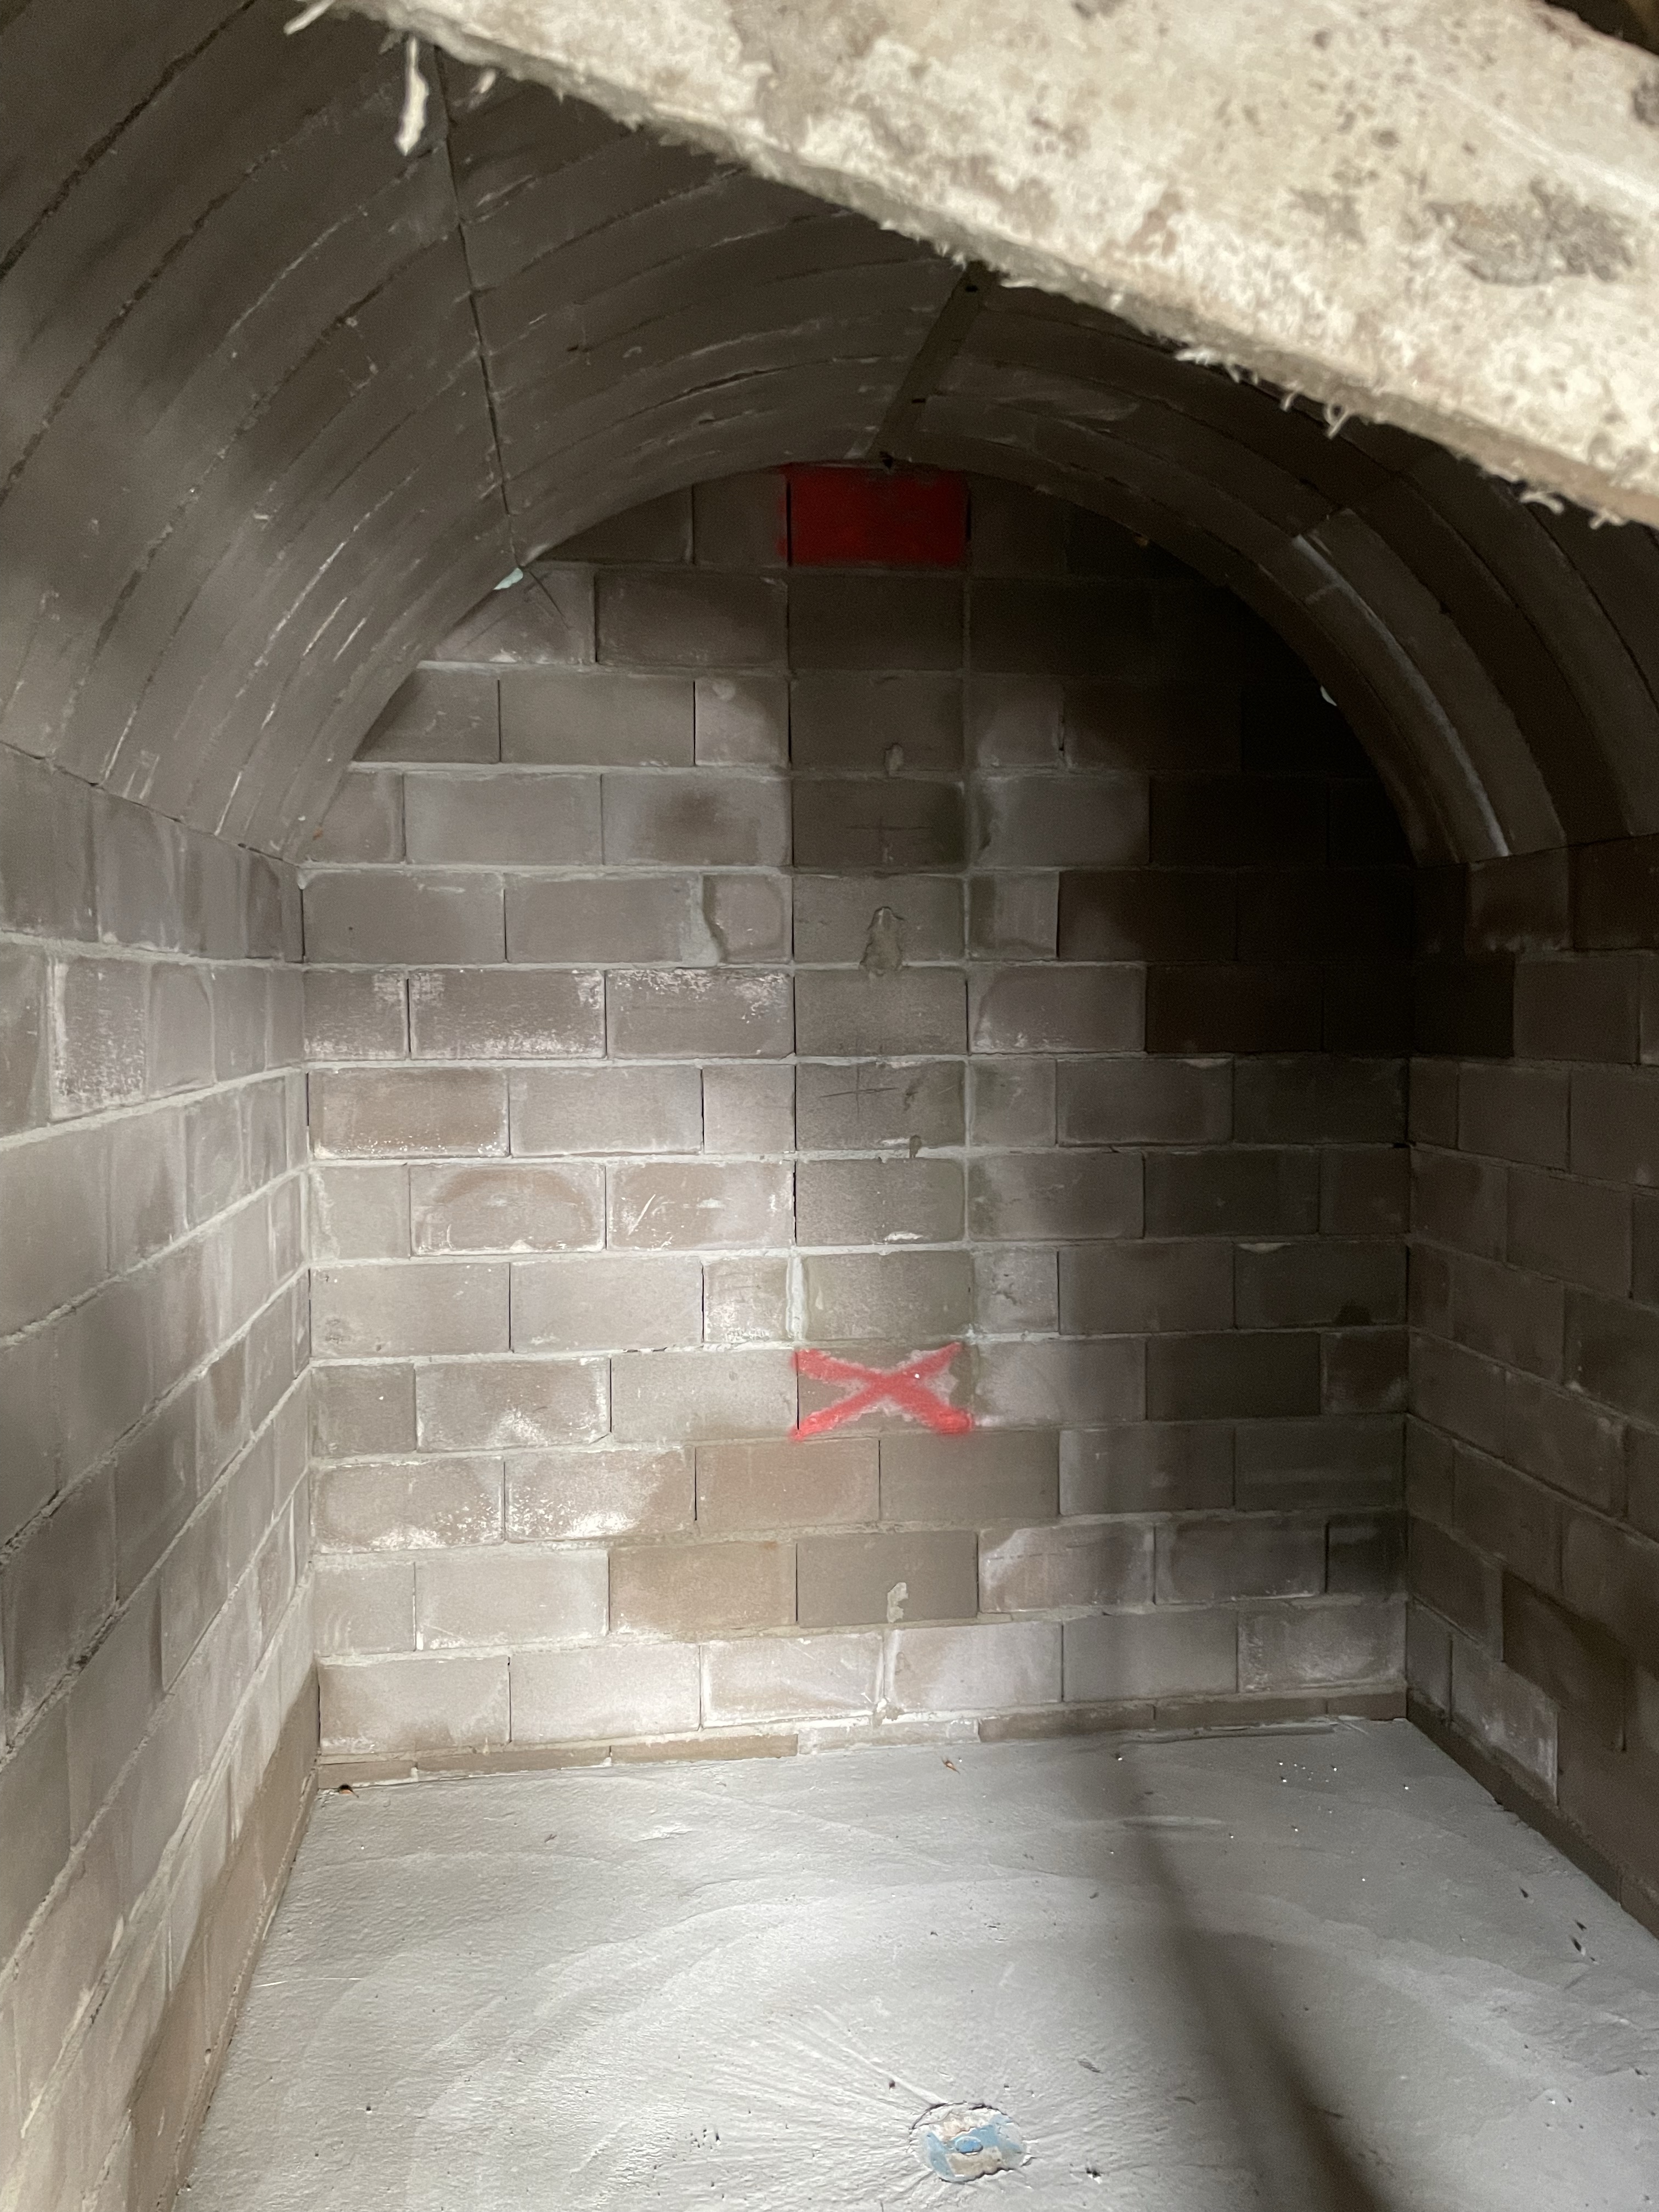
A few years after consideration, my brother and his wife decided to order this vault sauna. It comes as a kit but the construction process is a bit more laborious than putting together an IKEA shelf or a barrel sauna, but with the help of a local bulldozer guy and a bricklayer, and after getting the needed permits, the phase 1 was completed in weeks. I had the privilege to help to build a deck.
After the initial construction, the surfaces were rendered and the oven, the hot water boiler and the benches were added. The seating deck is above the the top of the oven for heat stratification between your head and your feat and to comply with the law of löyly.
There is still some landscaping to be done to properly hide the dungeon.
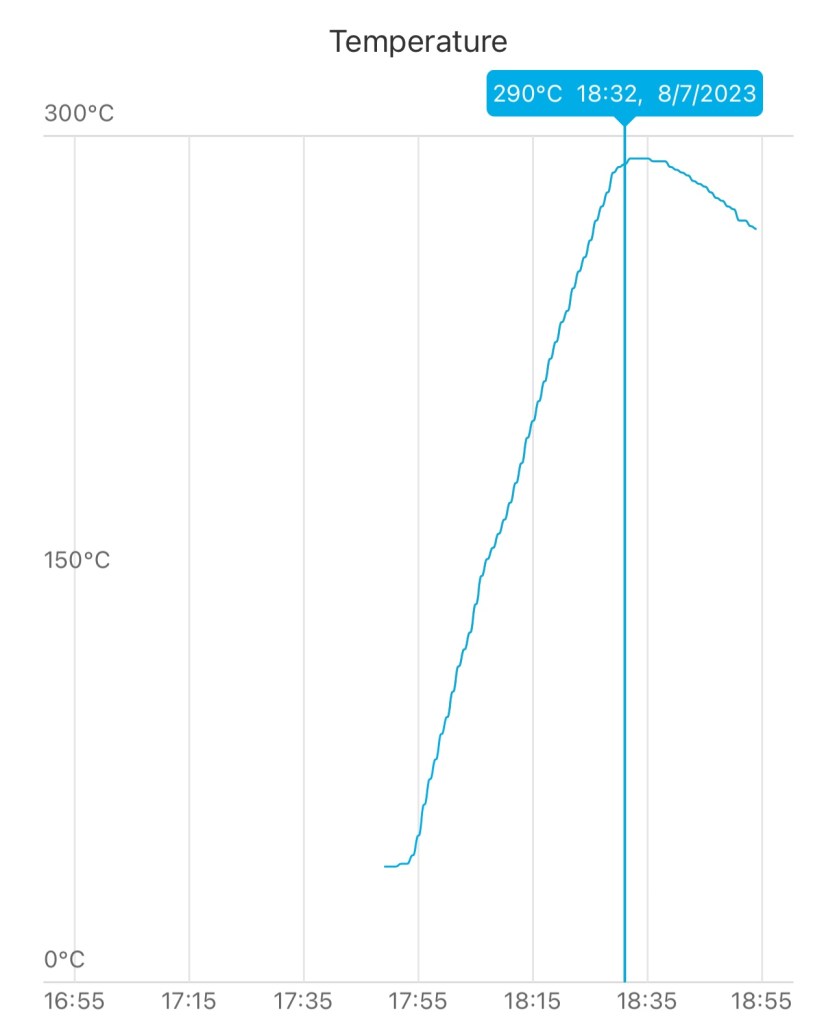
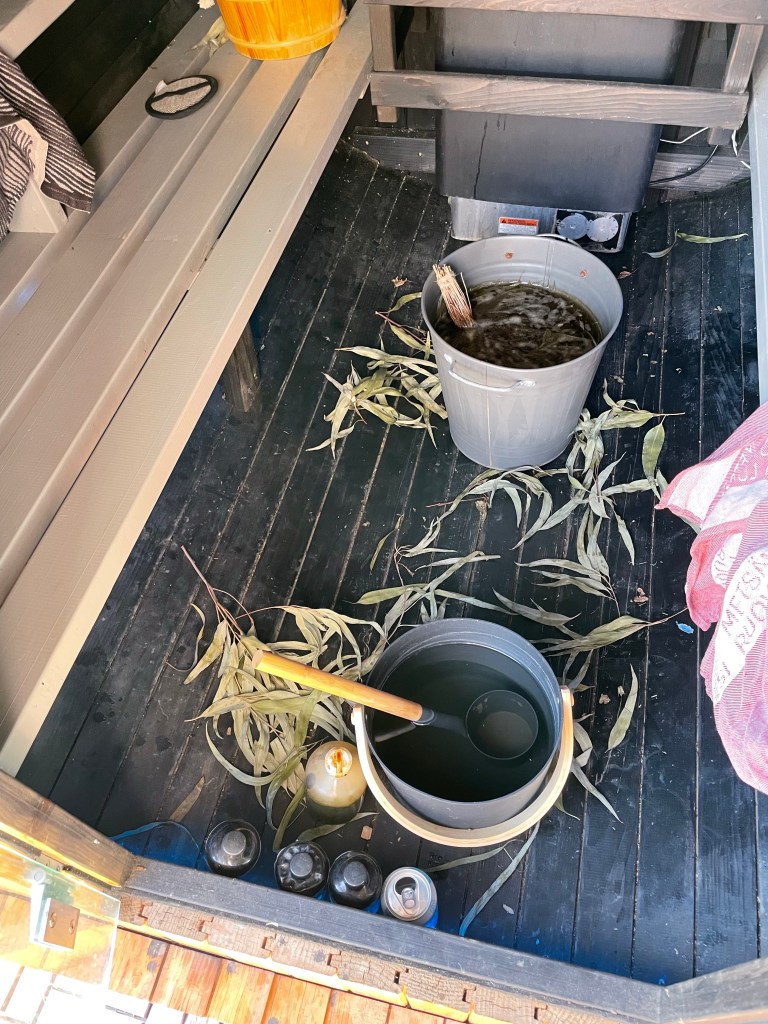
Heating up
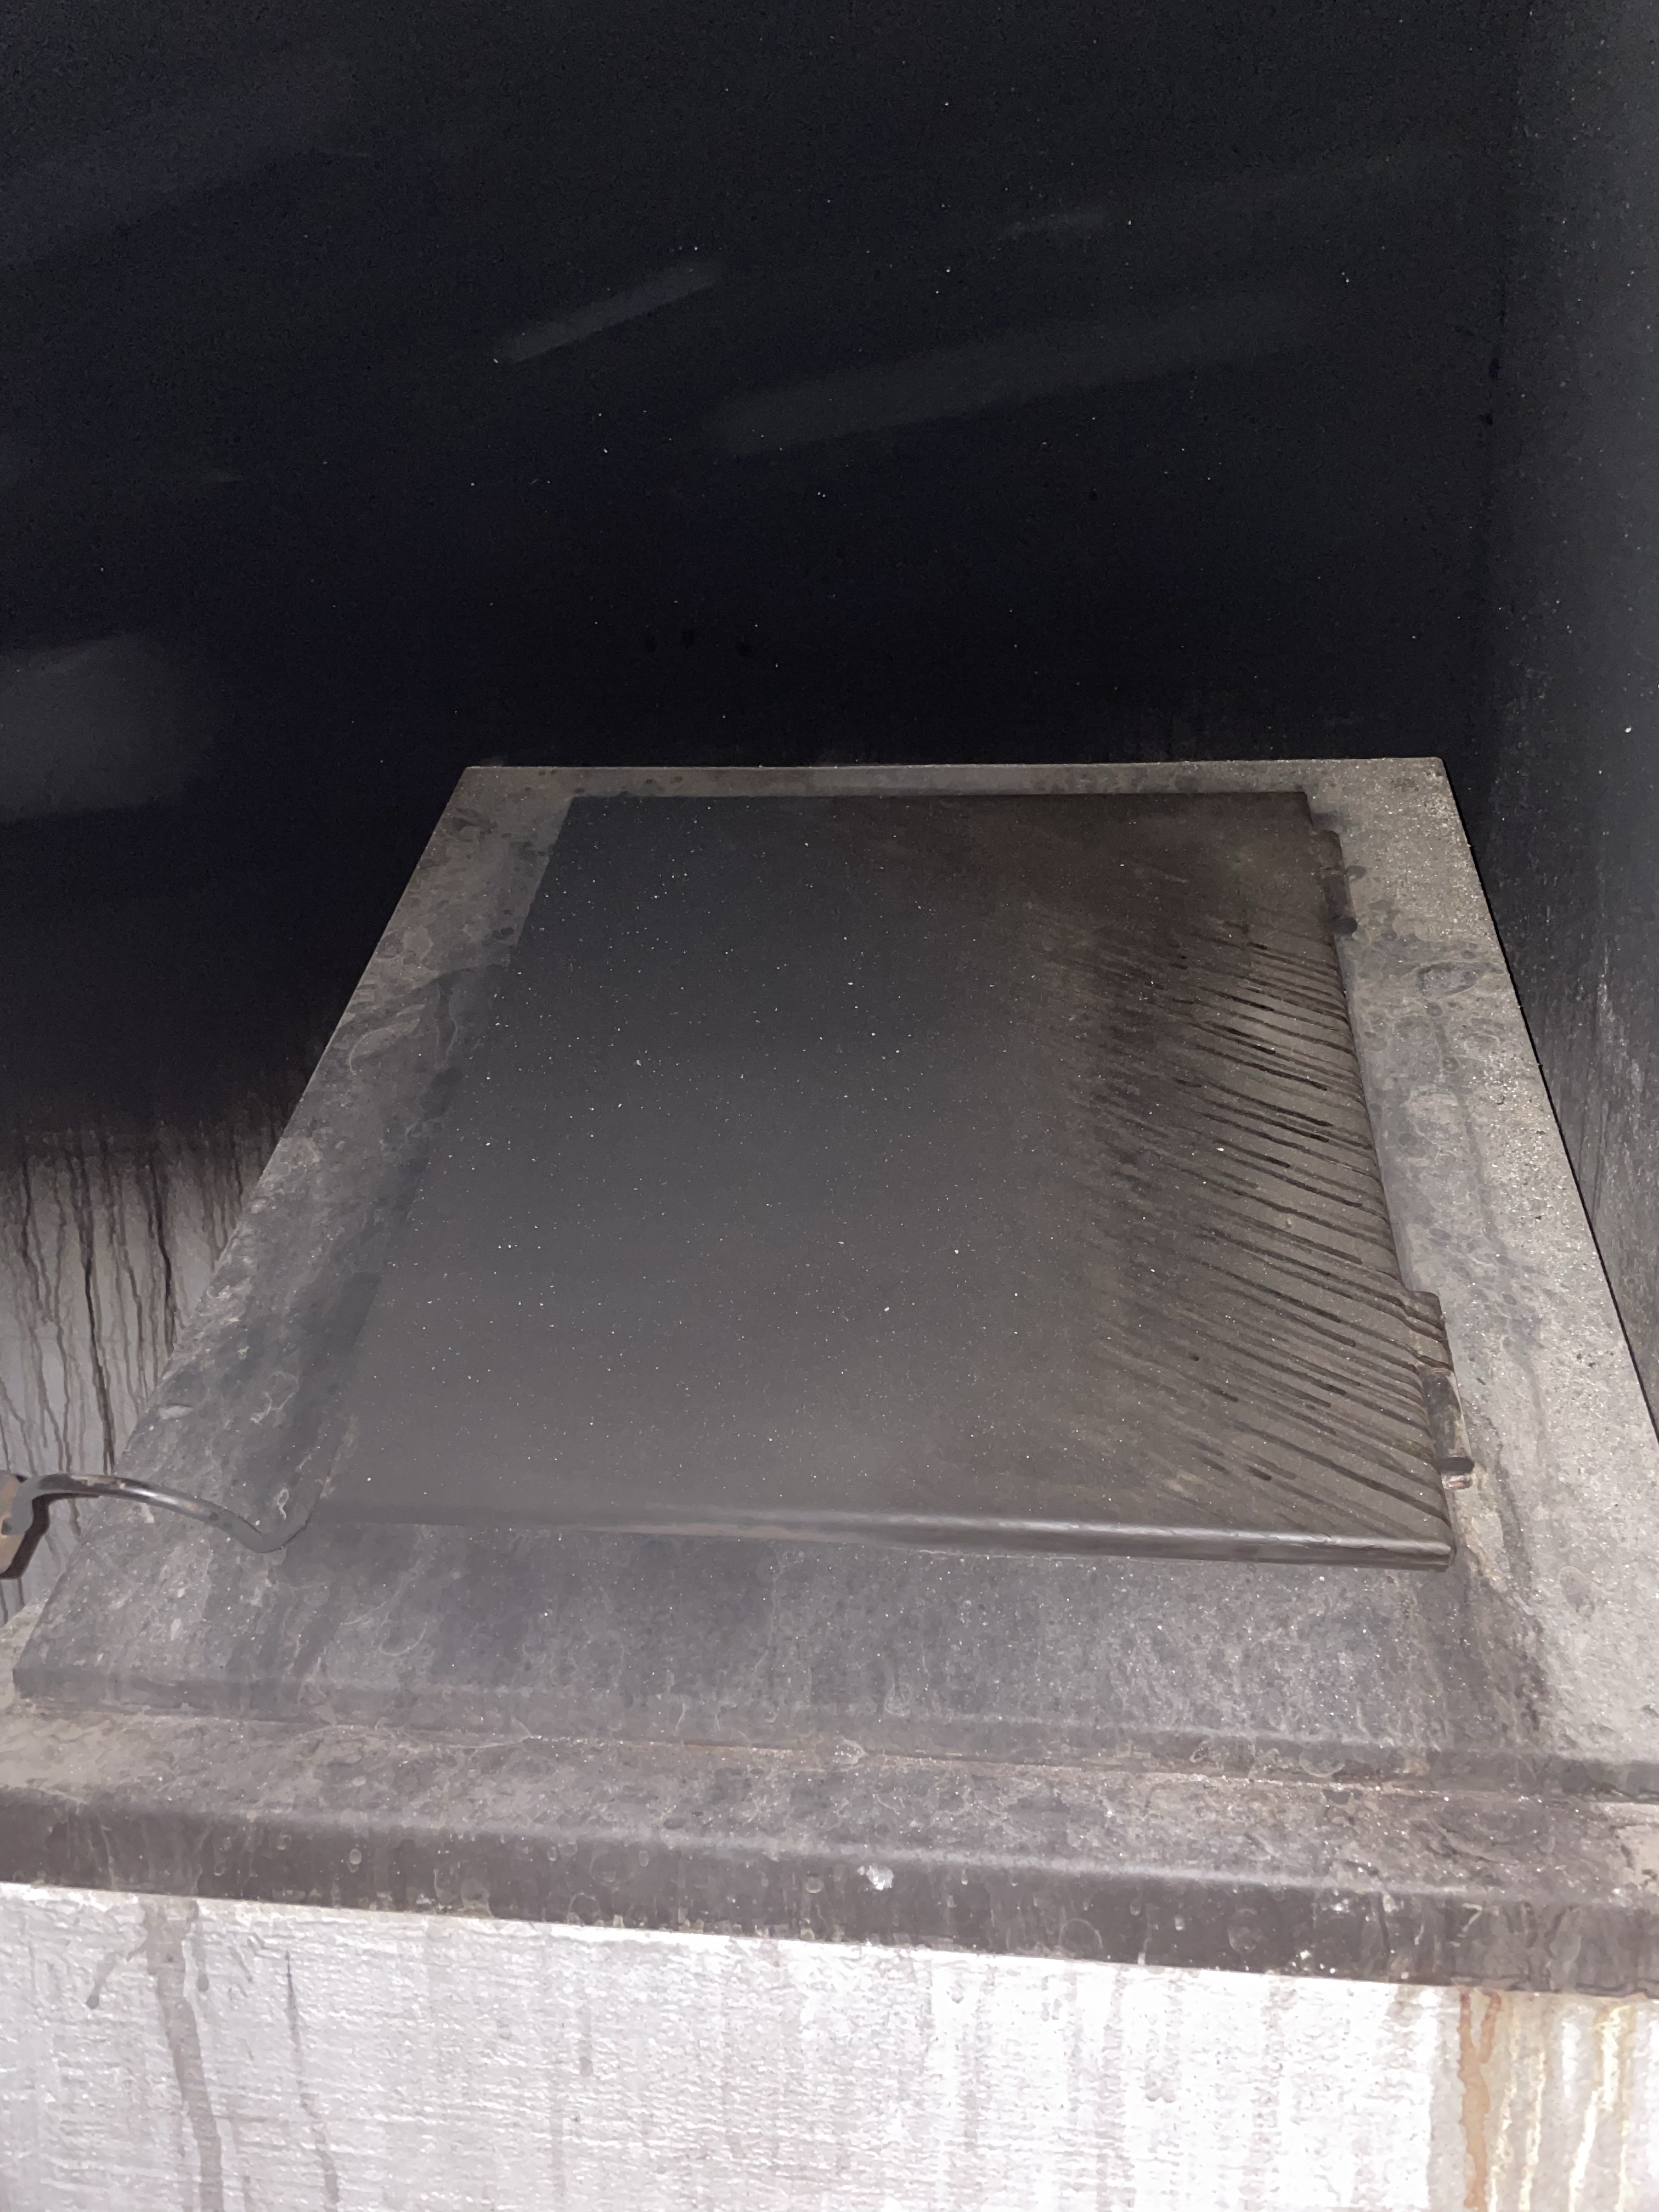
Heating up this sauna takes about two hours of active heating. Before heating, you carry the benches and armrests out because the would otherwise soot. You open the oven latch above the stones and make sure that the upper air vent is open to let the smoke out. There are two other latches in the oven that you should open too.
This sauna is heated from the outside of the sauna in the bathroom area, which is very comfortable. We used gray alder for heating up these saunas. Aspen is also an option but it generates less heat. Birch would soot too much and pine and spruce would crack and would not heat the stones enough.
It is important to keep adding wood constantly every 20 minutes or so. If you let the fire almost die and then add more wood, the flames will hit high and that generates more soot and possible more gasses.
After 1.5-2 hours of heating, you should see the stones below the top layer turning glowing red. At this point you should the fire die: make sure that no wood is burning and turn the ashes around in fireplace. Then you close the latches on the stove and open the lower air vent on the back wall and let the sauna work its magic to route fatal gasses (carbon monoxide) out of the room. There is actually a word for all this sauna magic in Finnish language: siintyä. That word is only used to describe this phase of preparing smoke sauna.
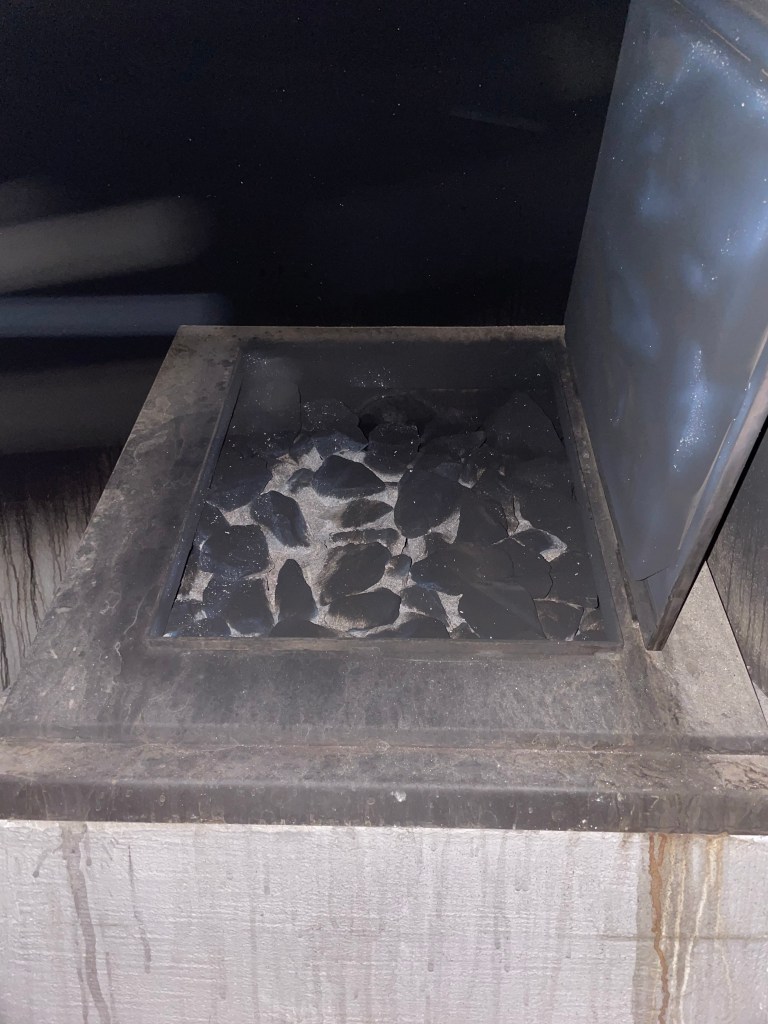
You can start saunaing right away or later. The stones should stay hot for about 20 hours. The more you wait, the less you burden the sauna stones. Typically you will have to change the stones after every 100-150 heat-up times.
When you are ready to start the sauna session, you clear the oven of all the ashes. When you open up the latch of the oven, you will notice how a layer of ash and soot has accumulated on the stones.
The next phase is ”häkälöylyt”, which translates to “carbon monoxide steam”. In reality, the idea is to get rid off the soot and ash on stones before saunaing – there should no longer be carbon monoxide in the room if the ventilation works. You pour water on different parts of the oven and quickly close the door. The ash and soot will land on benches and will be swept out.
After all that, we bring the seats in the sauna and start saunaing. The oven latch remains closed during the breaks and open when people are in the sauna. The idea is to preserve as much heat on the stones to allow longer sauna sessions.
You are not supposed to throw water on the stones. Instead, you gently pour water on the hot stones. You should work your way from one corner to another during different sessions to make sure that you get a perfect steam each time. In other words, you should not pour water on the same spot twice. When you hit it right, the steam concerto is just amazing.
The upper air vent latch on the wall is closed and the lower one under the bench is opened when saunaing. This directs the steam up to the ceiling and then down under the bench, which keeps the steam in the room longer and also warms the feet and the entire body more comprehensively.
The Vault Sauna Experience
I tried the sauna for the first time in May 2022. The outside temperature was around 15c. We did about five rounds each day in the sauna and poured about five-six ladles water on each round. I would estimate that in each round we stayed in the sauna on average about 10-15 minutes and cooled down in the lake in between so with breaks, our sessions ended up lasting probably about three hours.
The outside temperature was about 10c and it was raining a bit. My gut feeling was that the sauna was about 60c warm on the bench level. This sauna type will not heat up as hot as a traditional smoke saunas that are typically 80c or more. I personally liked the experience. You end up pouring more steam on the oven, which also keeps the air extra humid. Then if you just want to chat a bit longer in the sauna room, you feel comfortable and sweating but not exhausted.
The steam was very gentle and moved relatively slow in the room. It was difficult to say, how the steam circulated in the room, which was a cool experience in itself. In many smaller saunas, the steam hits your upper body hard and then disappears quickly so you know exactly the direction from which the steam hits you and where it goes. In this sauna, the steam just comes from somewhere and kind of drops on you. Very unique experience!
Overall, the experience was fantastic with relatively intense smoke aroma in the room too.
Rounds 2 and 3 with Temperature and Humidity Sensors
I tried the sauna next time in October, 2022. This time, the outside temperature was around 10 c. I brought in a wireless Ruuvi sensor to capture temperature and humidity in the air. I placed the sensor on the backrest of the bench so it was roughly at the chest level. It looked like that the temperature was hovering at around 55 c and the humidity reached to 90 g/m3. This means about 80% relative humidity, which is very humid compared to a regular sauna.
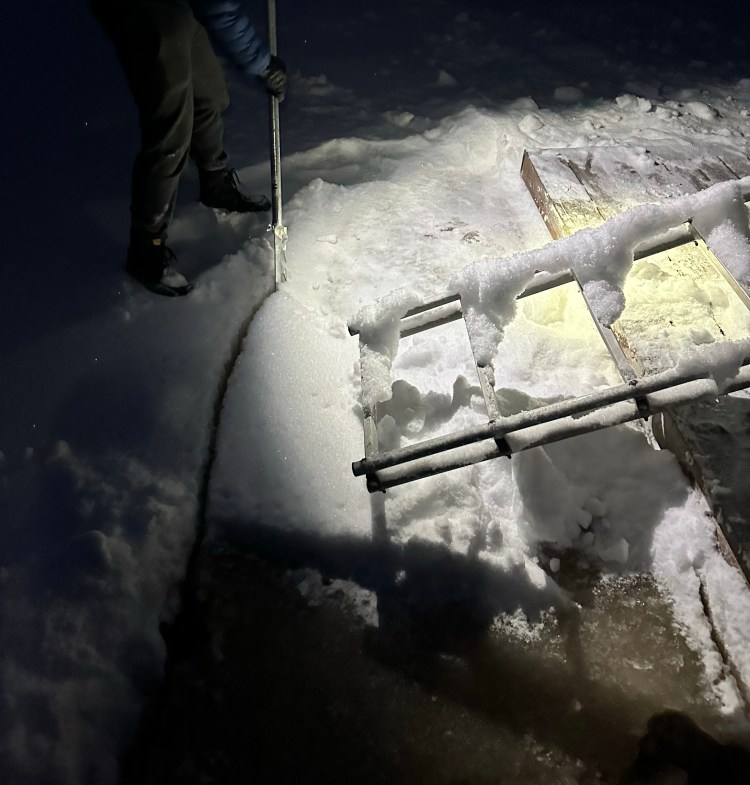
In December, I paid another visit to this sauna. This time, we enjoyed the darkest time of the year in Finland. The temperature was at around -10C and we had to break the ice to be able to cool off in a lake between the sauna rounds.
This time I placed two Ruuvi sensors in the sauna. The other one on the foot level and the other one on the chest level. This time it turned out that the temperature dropped a few degrees during the breaks as we closed the lid of the stove. Had we kept it open, I think the temperature would have risen a bit above 60 C. The temperature on the feet level was at about 37C after the sensor heated up.
The humidity readings were interesting: on the chest level, the humidity peaked at 66 g/m3 at 54.8C and 998 hPA, which means about 60% relative humidity. On the feet level, we measured 49 g/m3 at 39 C and at 998 hPa pressure. That means 98% relative humidity! You definitely feel like you are sweating a lot (although the sweat is mostly just condensed steam, read About Sauna Temperature and Humidity).
This sauna is definitely different and probably not ideal to those who are obsessed of getting the temperature to 220 F. The steam heats the whole body up, but it is gentle and super humid. The steam and how it hits you resembles Rajaportin sauna, which is hands down the best public sauna in Finland.
For The Next Visit
Now that we have enjoyed and the analyzed and enjoyed the steam, the bucket list item in this sauna would be to cook food there. Traditionally, Finns have cooked ham in smoke saunas. A whole ham was hung from the ceiling during the heat up and it absorbed all the good smoke, carbon monoxide, and carcinogens. They actually still sell smoke sauna cured ham as cold cuts in grocery stores (called “saunapalvi”). I doubt that those products are actually smoked in a sauna, but that’s where the name comes from.
This sauna does not necessarily heat up enough for curing a ham in it, but salmon might be an idea.
This article covers the differences of different sauna whisks. The sauna whisk ritual and tradition is discussed in another article on this page.
Birch whisks
The birch whisk is the most common whisk type in Finland. There are three main types of birch trees in Finland:
Rauduskoivu (Silver birch, Betula pendula)
Hieskoivu (Downy birch, Betula alba)
Vaivaiskoivu (Dwarf birch, Betula nana)
The dwarf birch only grows about one meter tall and the leaves are very small. This one grows on Tundra so if you ever end up to a sauna in Finnish Lapland, bring your own vasta (BYOV) from the south.
As far as the other two types go, the Silver birch is commonly used for making the whisks. Downy birch emits more nice aroma but the leaves tend to get loose easily so the pros sometimes tie a few downy brich branches in the middle of the whisk and silver birch branches on the outer rings.
The best part of the birch whisk is the aroma they emit in sauna. Pour the water where the whisk sits on the stones!
Juniper
Juniper whisks are more rare but not unheard of. They are used sometime during Finnish Christmas sauna because they are evergreen. The juniper whisks should be treated with boiling water for about an hour before use to soften the branches and especially the needles. You should also use these whisks more gently.
I have tried juniper whisks a few times and they feel almost like acupuncture treatment. The water emits fantastic aroma when poured on the stones.
I’m growing juniper in my garden so the official review with pictures is due in December.
Oak
Oak whisks seem to be more popular in Russia and Eastern Europe than in Finland. My experience is that they feel pretty similar to birch whisks. The aroma is different and I prefer birch but oak whisks probably feel a bit softer on skin.
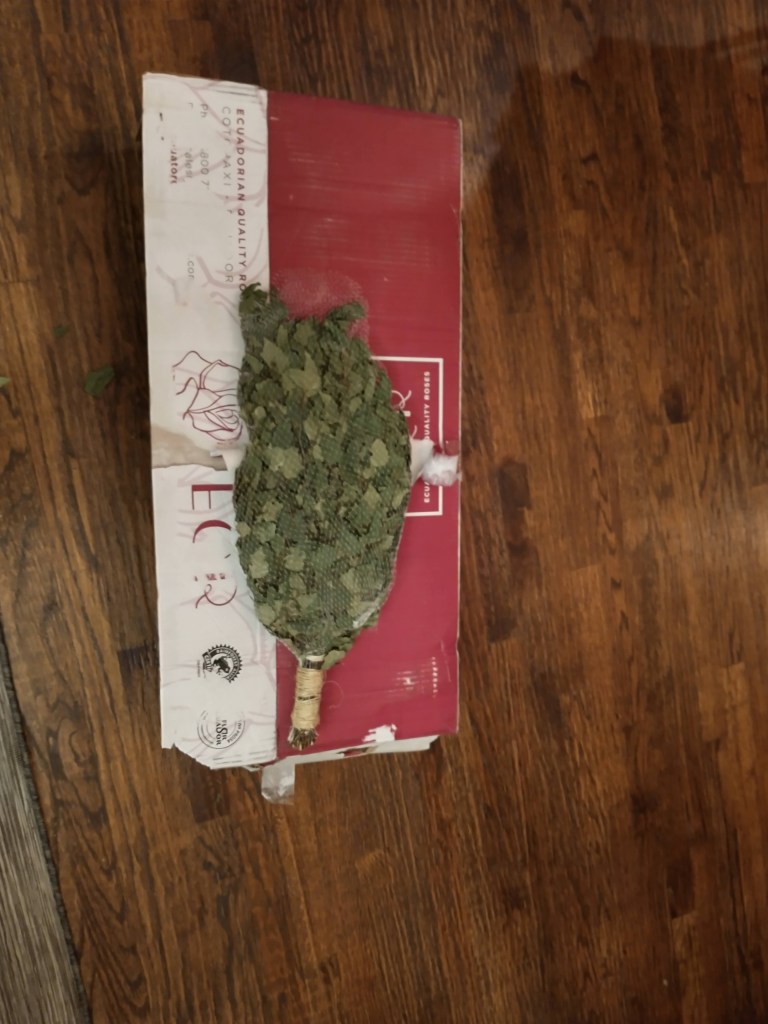
Eucalyptus
I’ve been always wondering, how eucalyptus oils and eucalyptus whisks made their way to Finnish sauna. If you look at the map, you cannot get much further away from Finnish saunas than by going to an eucalyptus forest.
Never judge before trying though so I tested these. The whisking experience wasn’t bad. It was interesting and I would assume rowan or fern might be quite similar (to be tested later). The leaves are long and pointy and quite sharp from the edges. They didn’t cut the skin though. The aroma wasn’t very similar to eucalyptus oil, which was surprising. I used dried whisk though.
The leaves got loose easily too but luckily they were easy to clean.
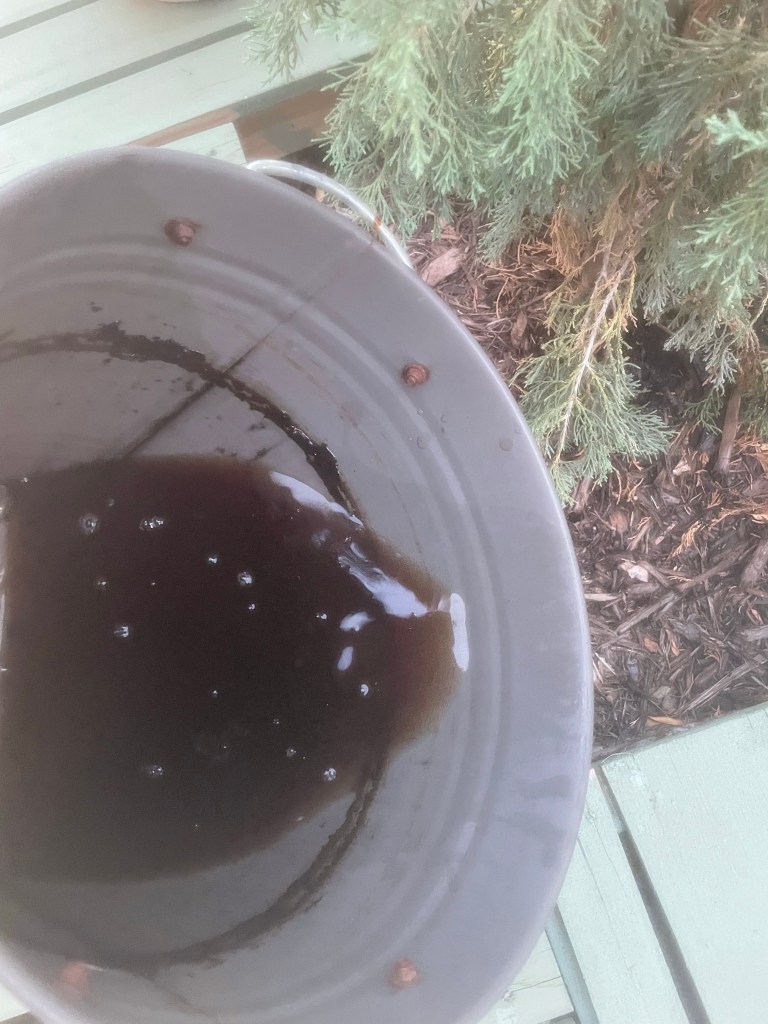
Another interesting thing was that the whisk colored the water very black. I poured the water on the stones. Not great but not horrible either. My verdict is that if I didn’t have another whisk around, I would use eucalyptus rather than nothing but I wouldn’t spend the same money to buy eucalyptus whisks if I could get birch.
Linden
Etsy.com was selling dried linden whisks that I had never heard of. I decided to give it a go.
The aroma is pleasant: not very strong and not very exotic for a Finnish guy either. I still prefer birch aroma but this one was very nice too.
After soaking the whisk for a good hour or two, it weighted probably around five kilos. The whisk was very thick too so the whole massaging experience was different. It felt like a warm wet towel in a good way: intense but soft at the same time. I noticed that this whisk warms up very fast during preparation (see the The Saunavasta (sauna whisk) Tradition post) probably due to thickness. All in all, this was very positive surprise and I will certainly order more of these!
One downside of this whisk is that the leaves come off rather easy so there’s some cleaning after the sauna session.
Barrel saunas are popular especially in North America. They are rather easy to fit on backyards and also relatively inexpensive and they look cool.
One challenge with this sauna design is ventilation and heat stratification. While the basic rule of löyly (steam) in Finnish saunas assume that your feet are above the top of the stove for better heat and steam experience, in barrel saunas you keep your feet on the floor. Another design choice in barrel saunas is that ventilation is often implemented using gravity based ventilation where air intake is on the floor level below stove and the exhaust is on the opposed wall on the top. This is probably the only meaningful way to implement proper ventilation without mechanical components but the downside is that this solution often creates draft on the floor and it further increases heat stratification.
I cannot really say that I was bothered by any of these ventilation or stratification issues but multiple threads in different sauna groups in Reddit and Facebook prompted me to look into this.
Electric Sauna Ventilation in Theory
There are multiple quality articles about sauna temperatures and ventilation available online. I’ve found these masterpieces the most useful:
Temperatures and humidity without mechanical ventilation
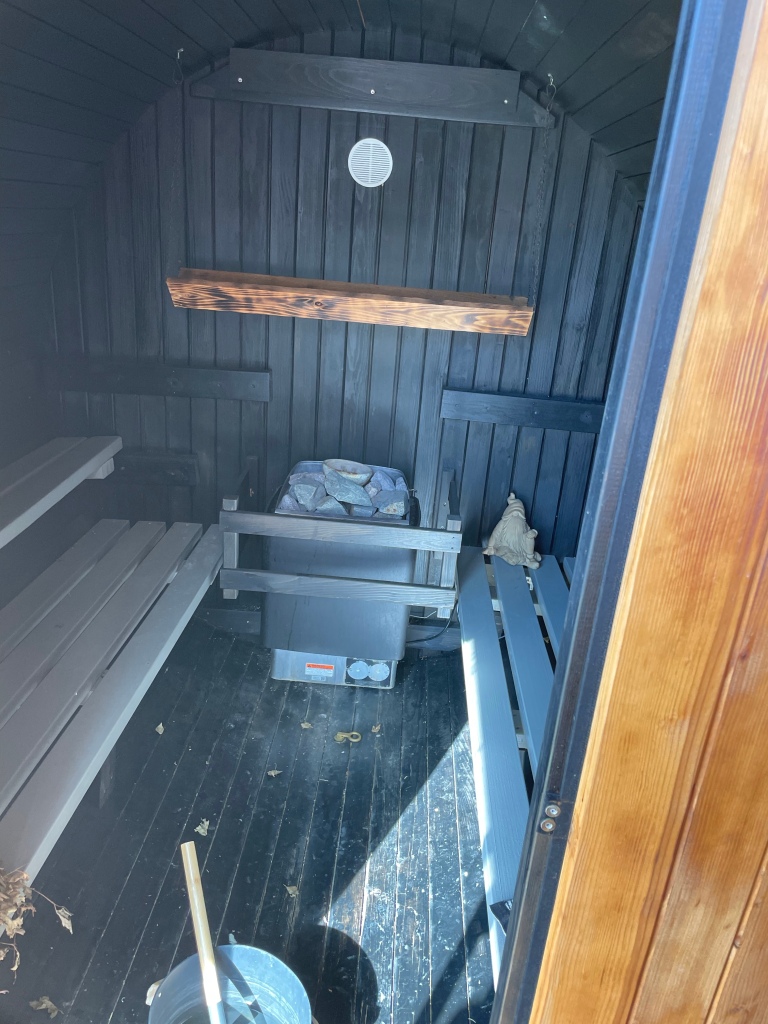
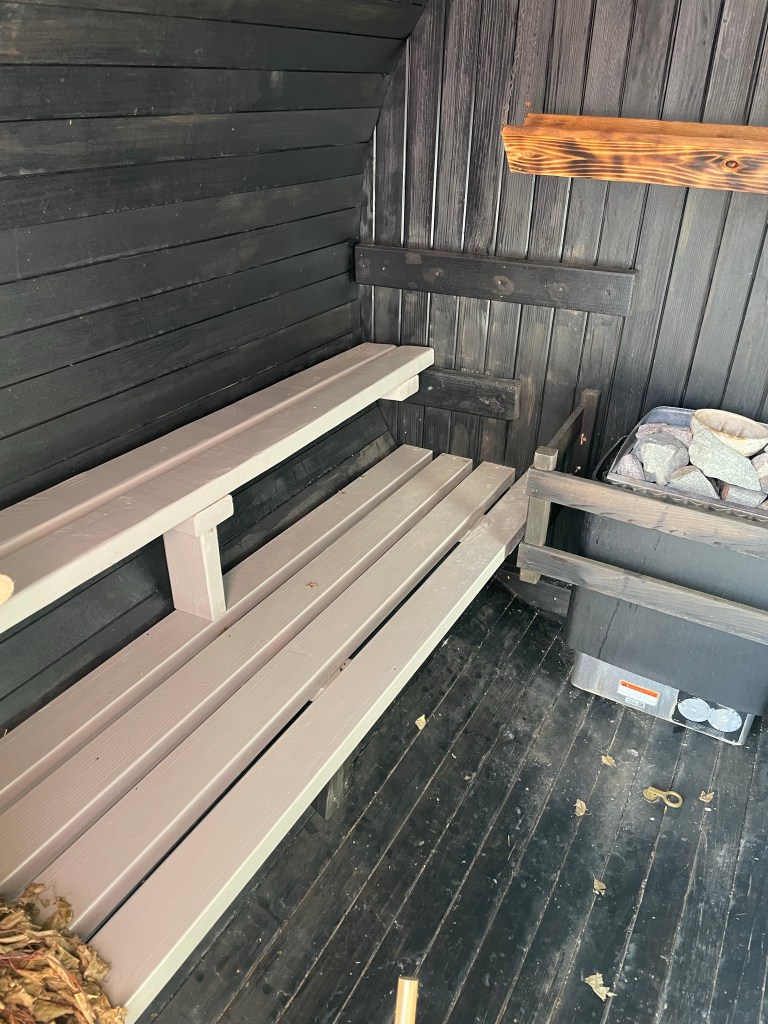
I have three temperature and humidity sensors in my sauna as illustrated below. These sensors write their readings to a MariaDB. The top sensor writes two values per second whereas the Bluetooth sensors write in about five-second intervals.
Three sensors to measure temperature and humidity on the floor, on the bench level and at the top.
Experiment 1 – standard ventilation
For starters, I measured temperatures and humidity first by using regular ventilation: cool air was sucked in from below the stove and I kept the exhaust vent closed so the air escaped from the gaps as air pressure increased after adding steam.
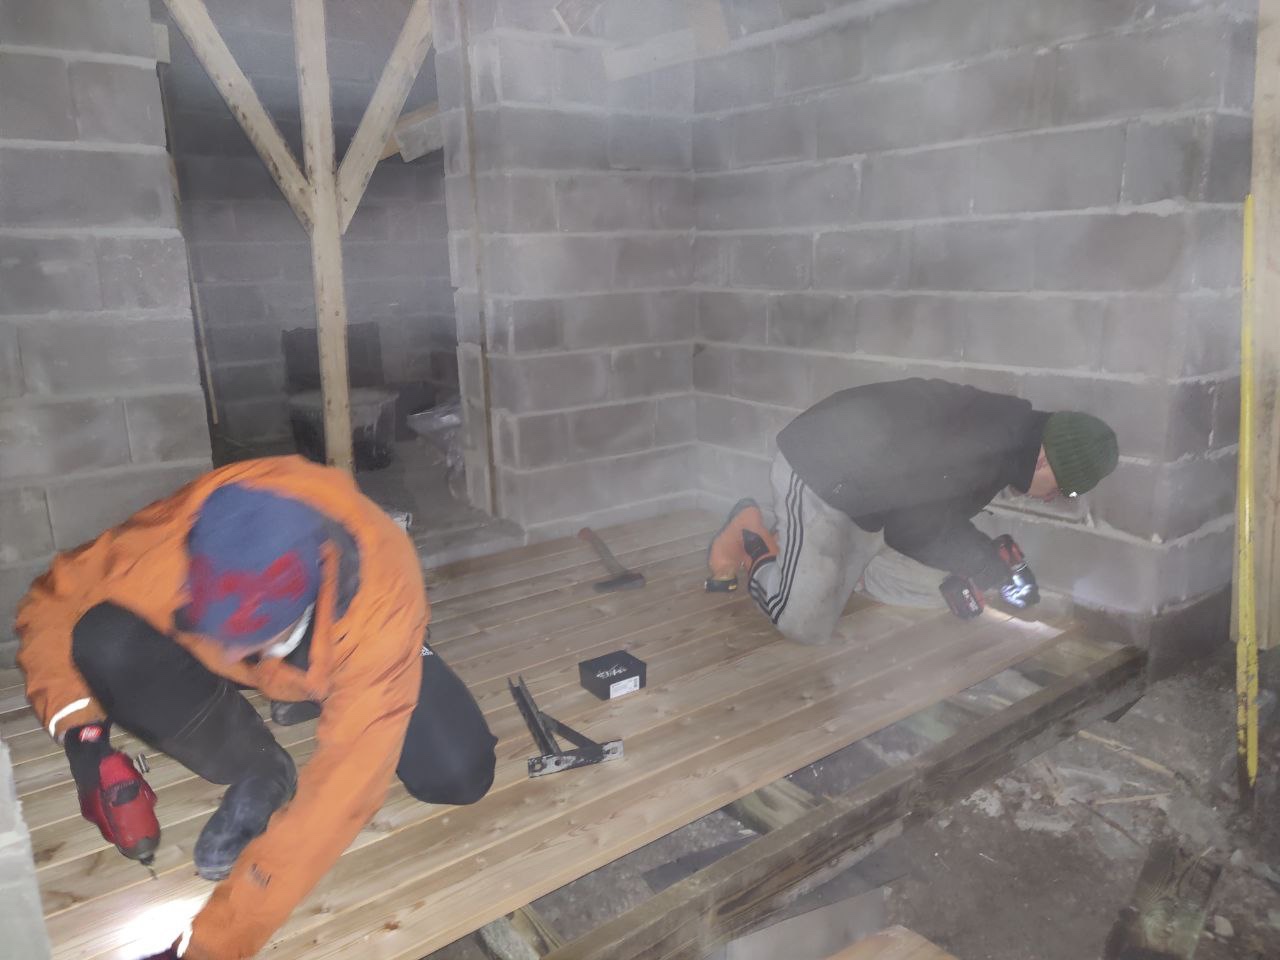
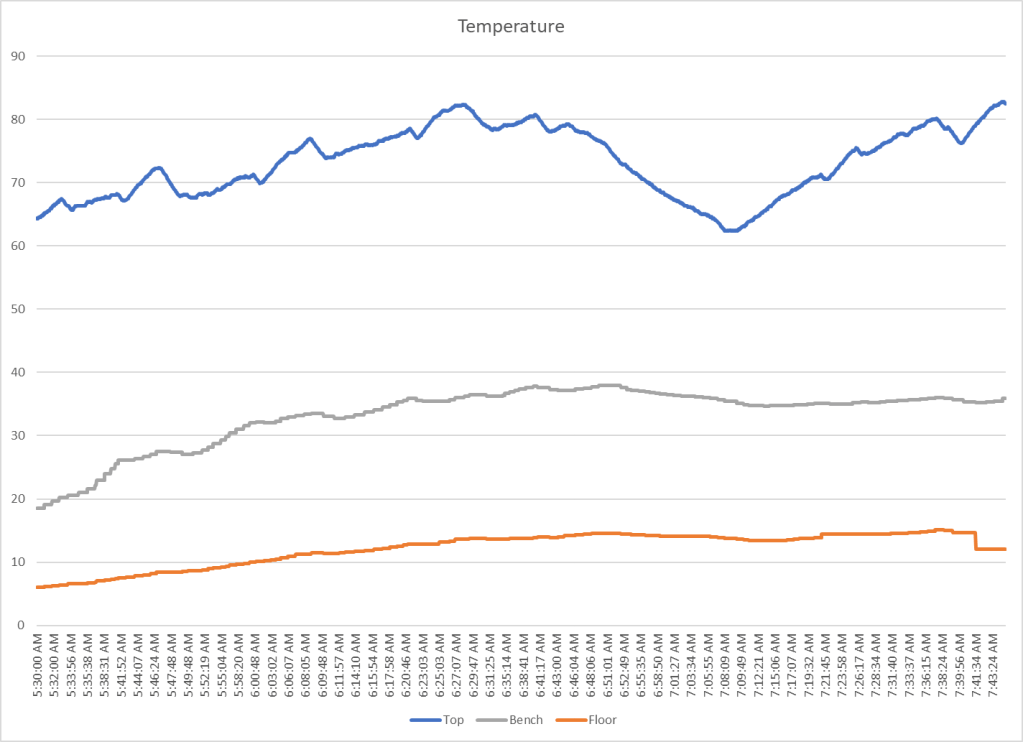
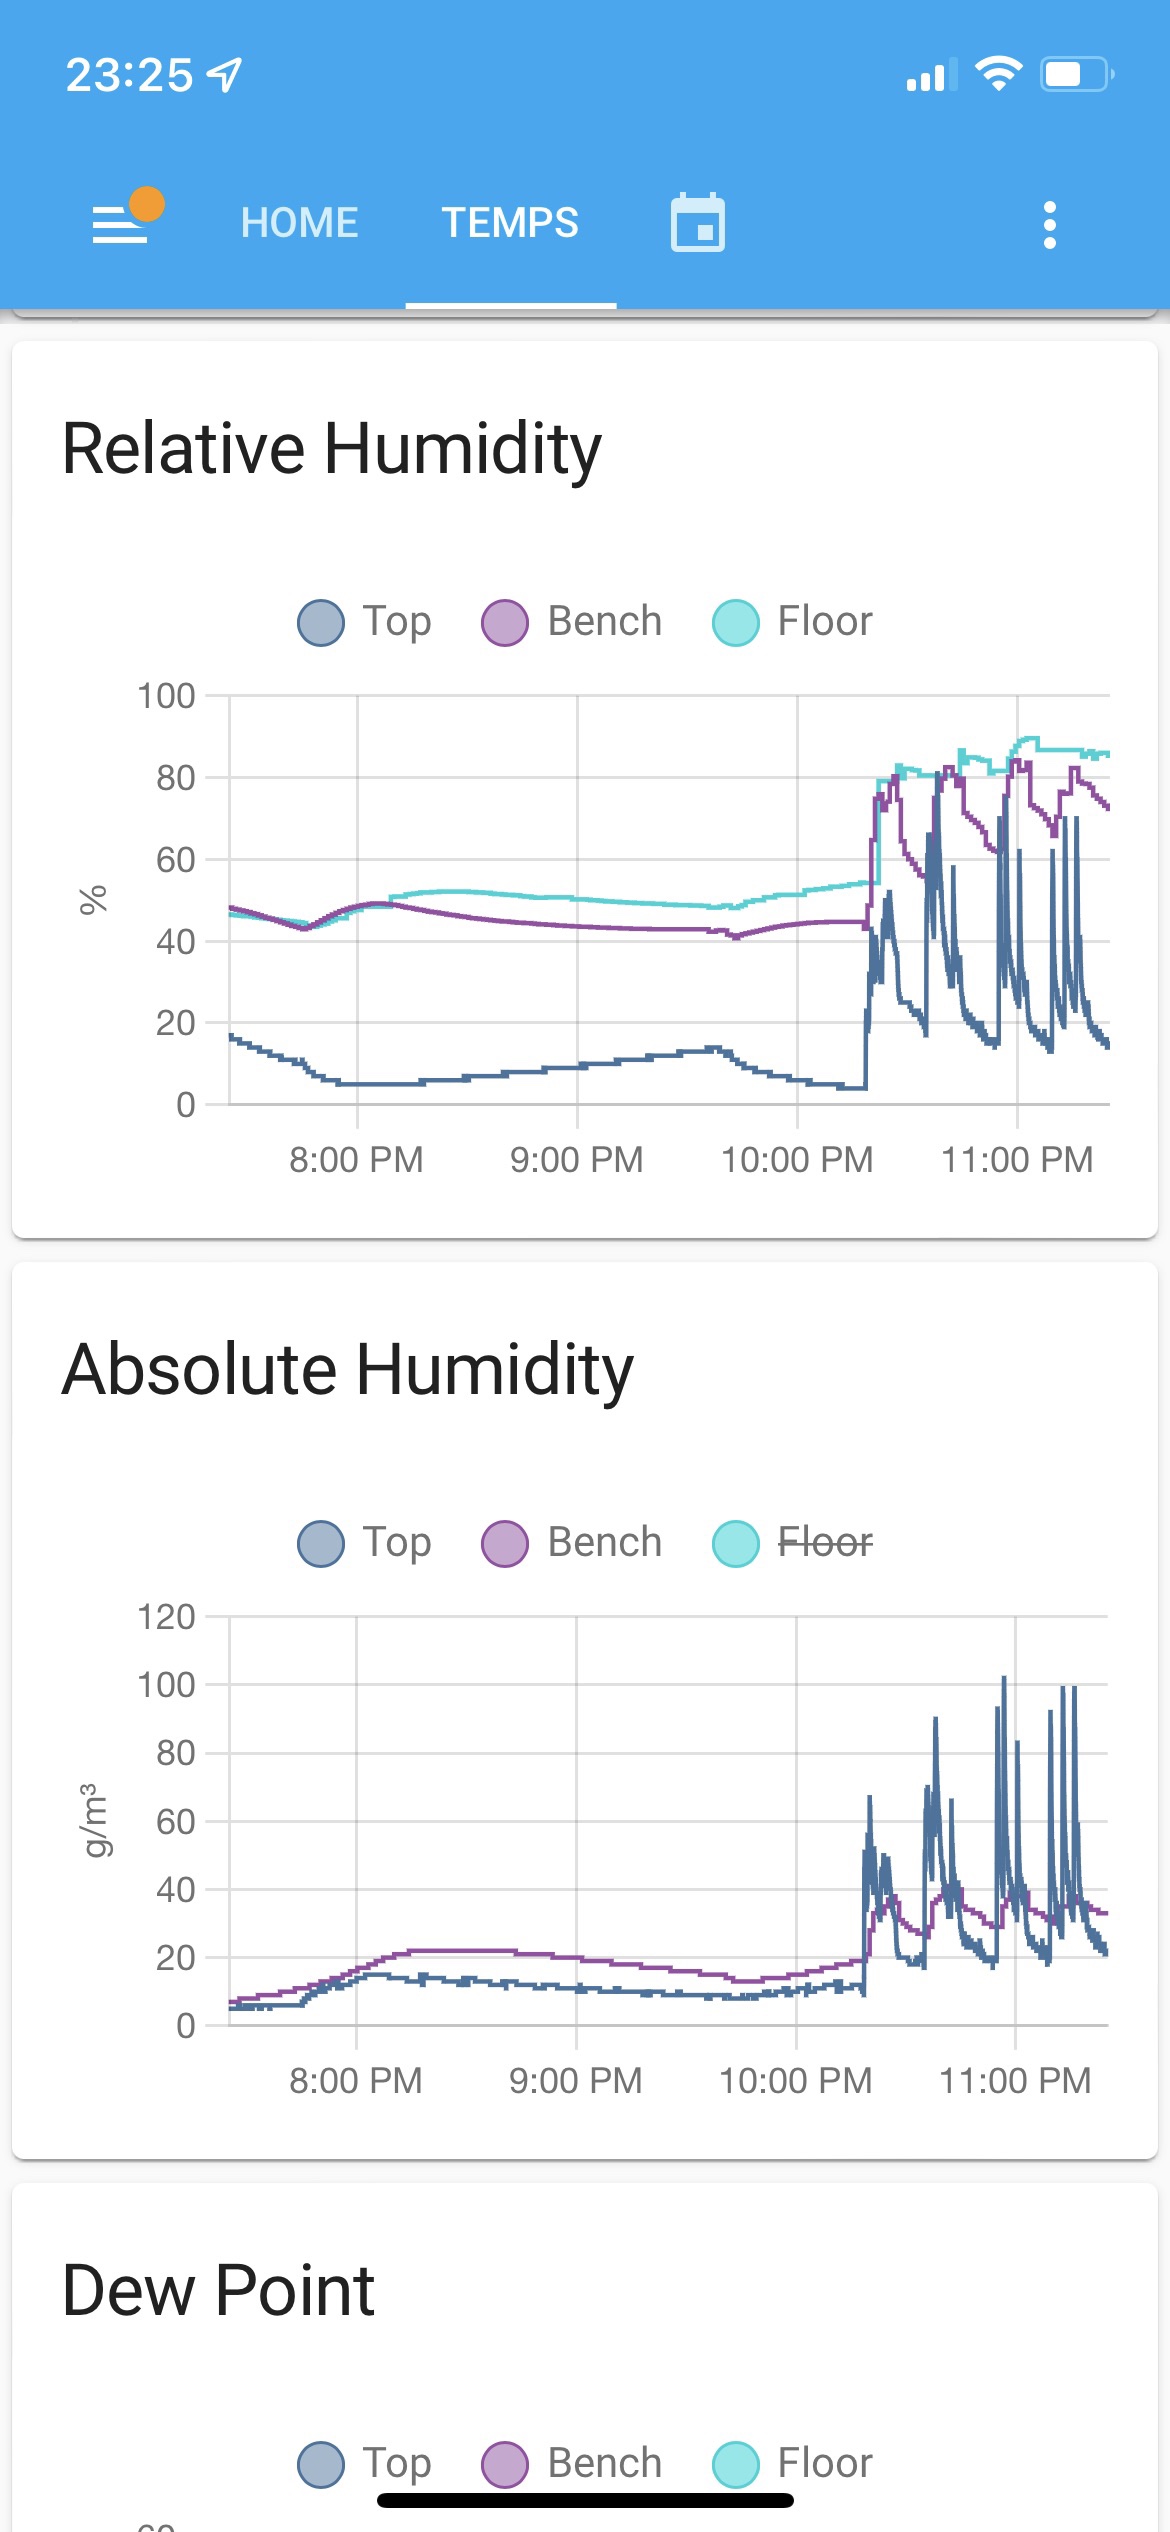
Below you can see the temperature graphs of a typical sauna session. You should notice about 40c difference between the top and the bench level. Floor is typically 5-10c warmer than outside air and in this session outside air was a few degrees above freezing. I shut down the stove in the half way and you can see, how the temperature starts dropping quite quickly on the top sensor but not so much on the floor or on the bench level. The challenge is to get the bench level temperature to above 40c especially in winter.
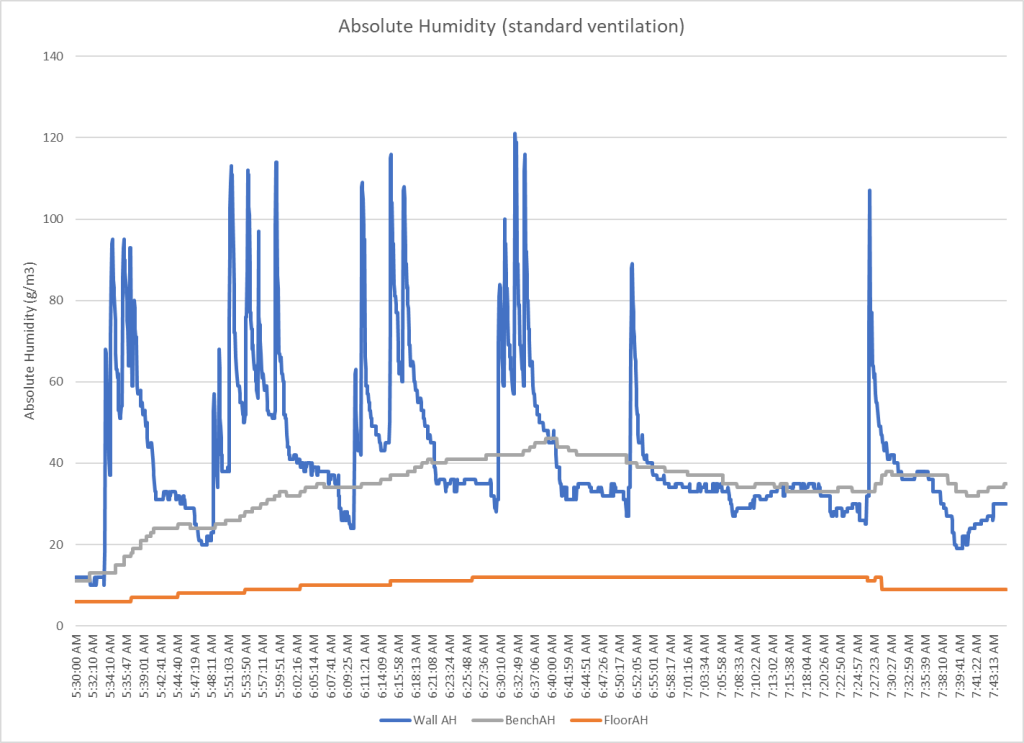
Looking at the humidity graph – you can see the readings in the top sensor spiking as I add steam. The bench sensor indicates that not much happens on that level. In other words, the steam goes to the roof level and stays there until the hot and humid air escapes from the gaps.
Mechanical VentilationImplementation
My conclusion after reading different articles of ventilation was that mechanical ventilation is the only viable way to go with electric saunas. In Finland, people don’t really think about this because electric stoves are mainly used in apartments and you must implement mechanical ventilation there anyway. You can still build it wrong, of course.
My idea was to bring fresh air above the stove mechanically using a 195 CFM fan from Vivosun ($30 investment). I then got a few WiFi plugs so that I could turn the vents on an off using my sauna app. Unfortunately, these fans are not adjustable so the only ways to control the flow would be by installing adjustable vents and by turning the fans on and off.
The fans are able to circulate 195 cubic feet air per minute which is about 90 liters per second. I haven’t found specific guidance on the ideal air circulation but some sources suggest 3-7 liters per m2 per second. This barrel sauna is about 3.2m2 in the middle so in any event 90 liters is probably way too much.
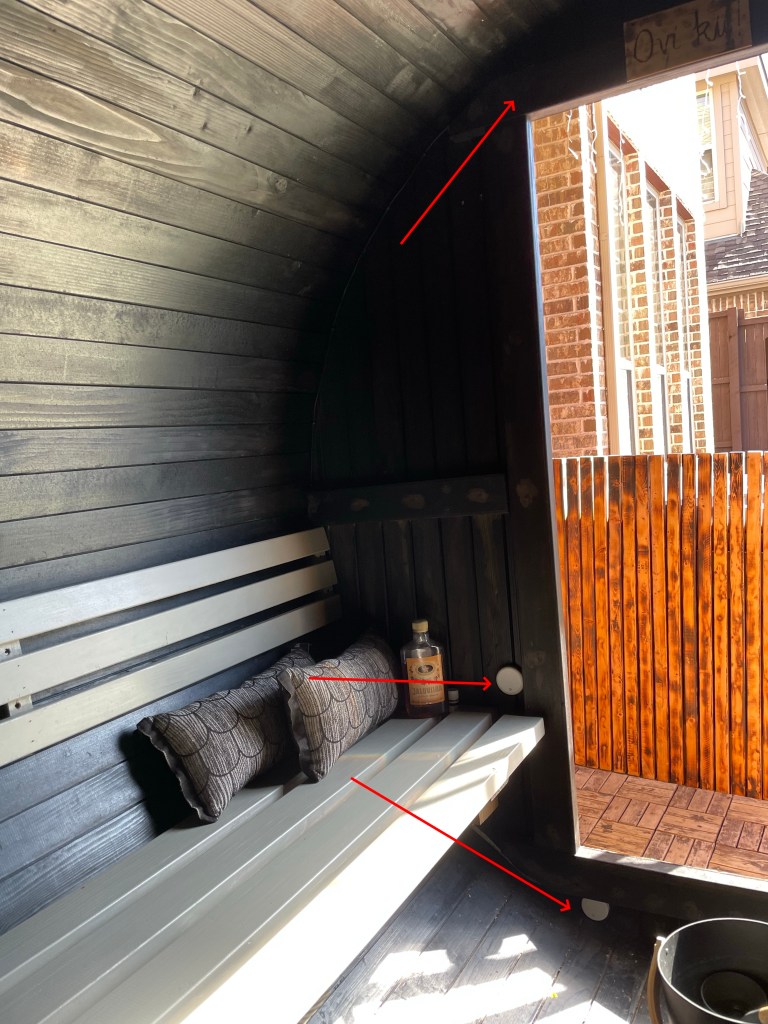
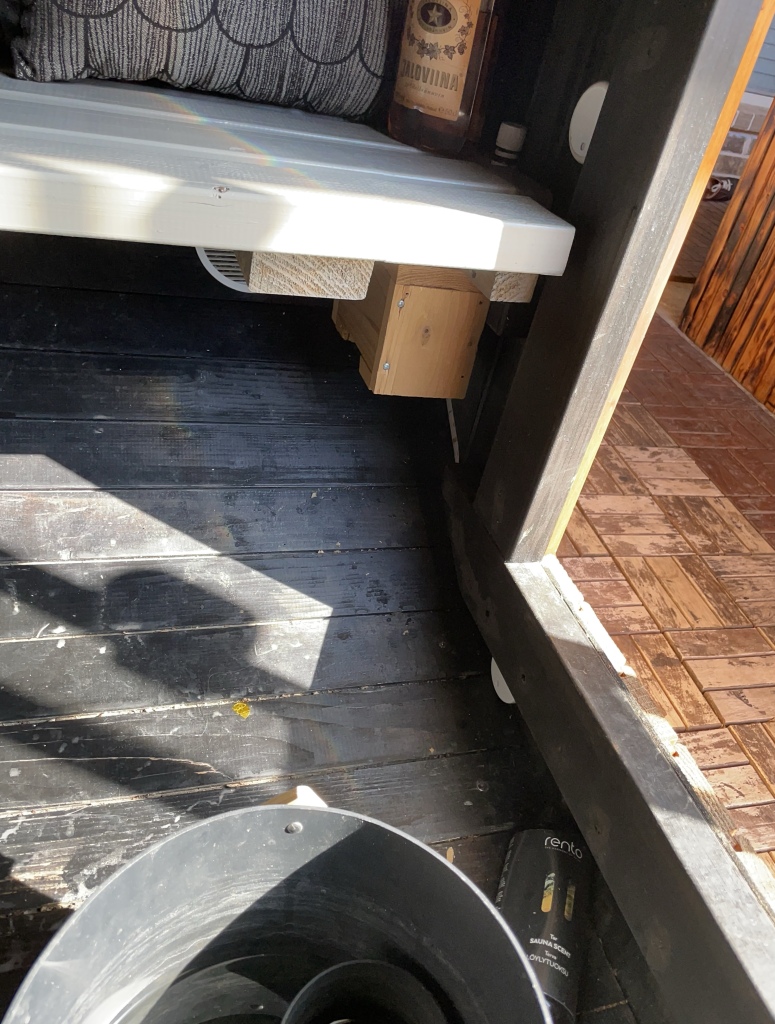
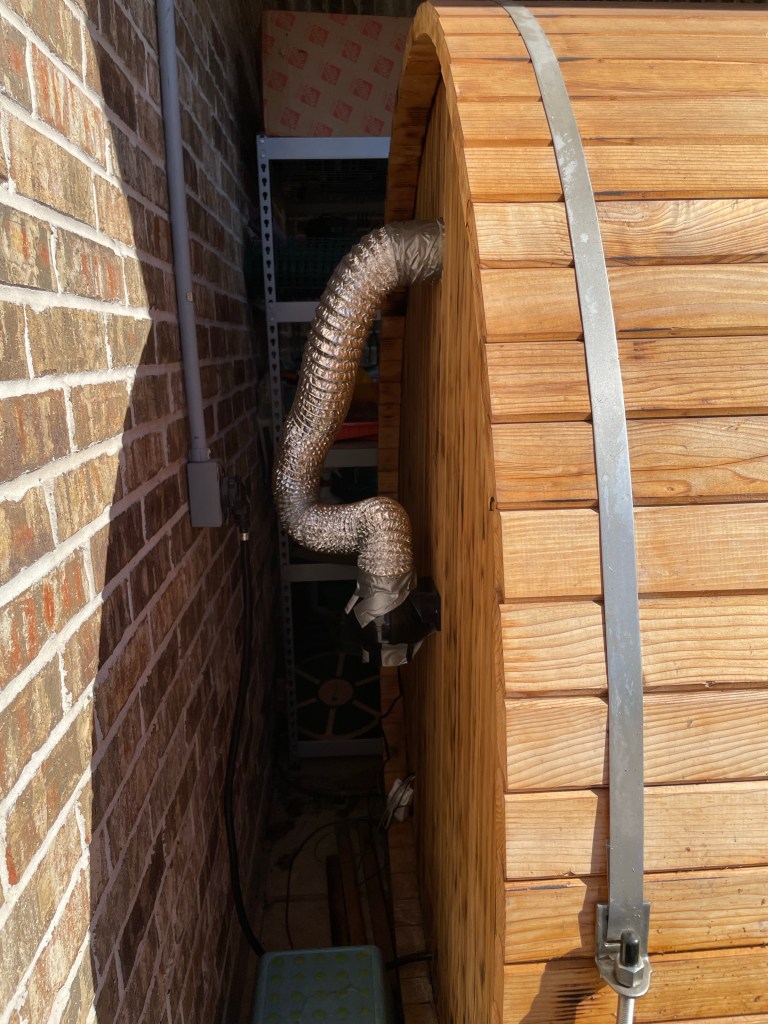
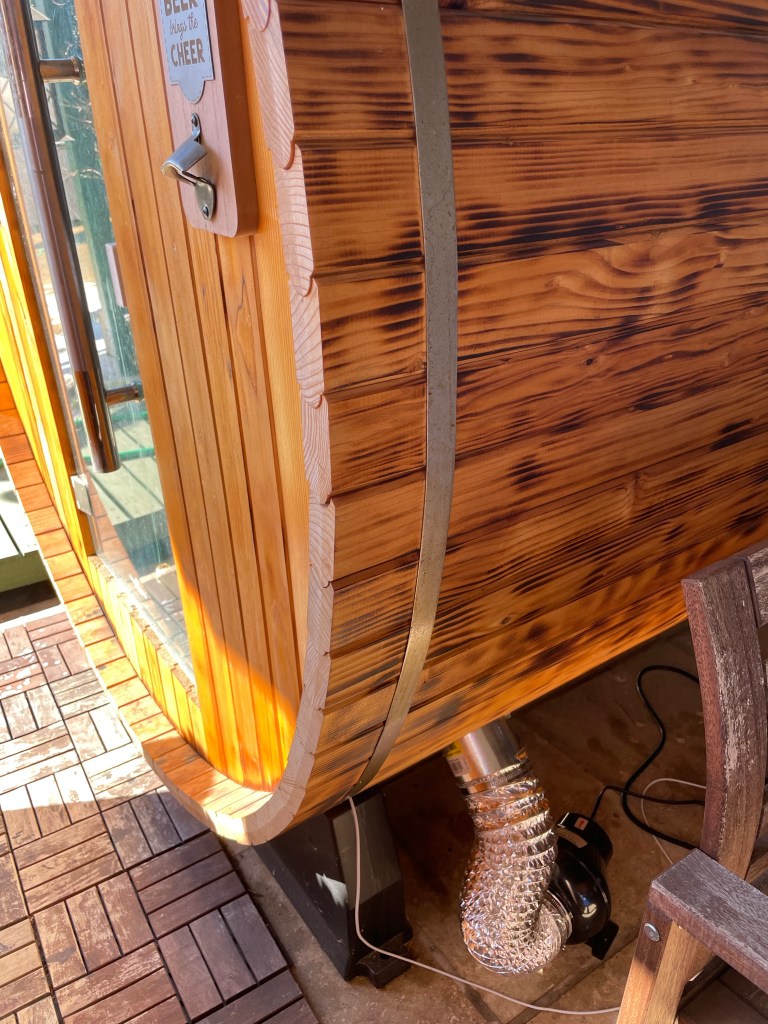
I added 4-inch vents above the stove and on the floor on the opposite side as illustrated in the pictures below. The location for the exhaust vent is a bit tricky due to the shape of the sauna. Somewhere on the lower part of the door would have been more ideal, but not very practical :).
Experiment 2 – timed ventilation
My first experiment was to keep the vents closed during the heat up and then use home automation so that both fans start running for 60 seconds when the top sensor detects steam.
While mechanical ventilation seemed to improve air quality (the air felt more fresh), there was little to none impact in sensors. However, this might also be because my bench sensor is a Bluetooth sensor and it is less reponsive than the top sensor that is hard-wired.
Experiment 3 – Continuous ventilation
The second experiment was to switch on both vents when I started saunaing. I have also tried to keep the ventilation on while heating up the sauna but that doesn’t seem to do much else than lengthen the heat-up time.
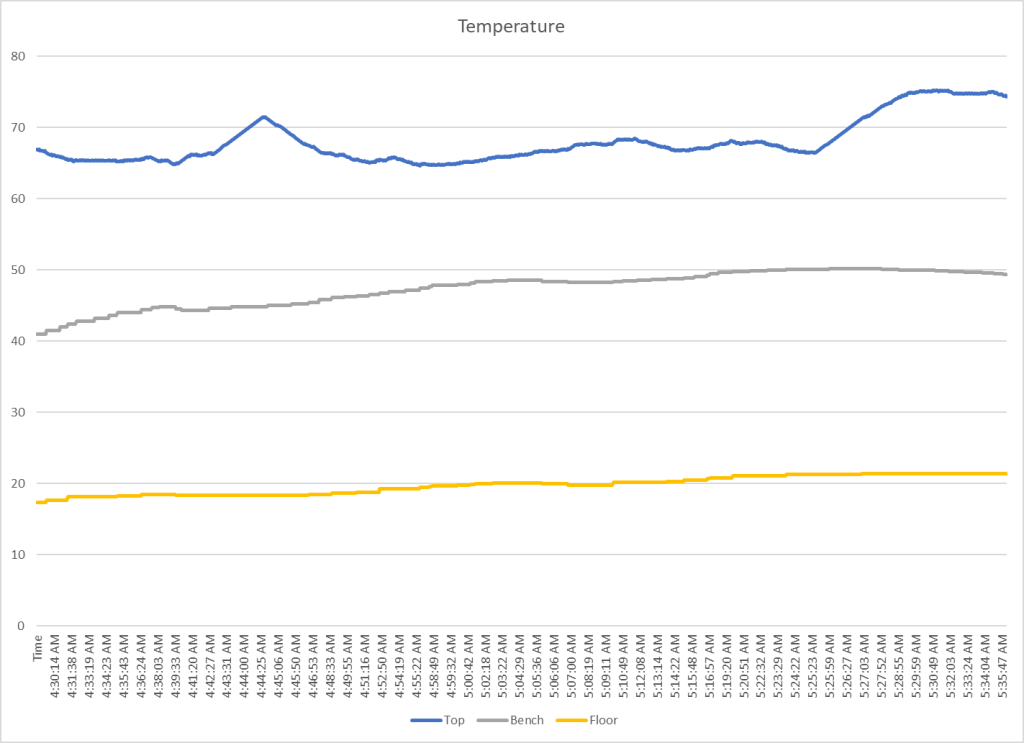
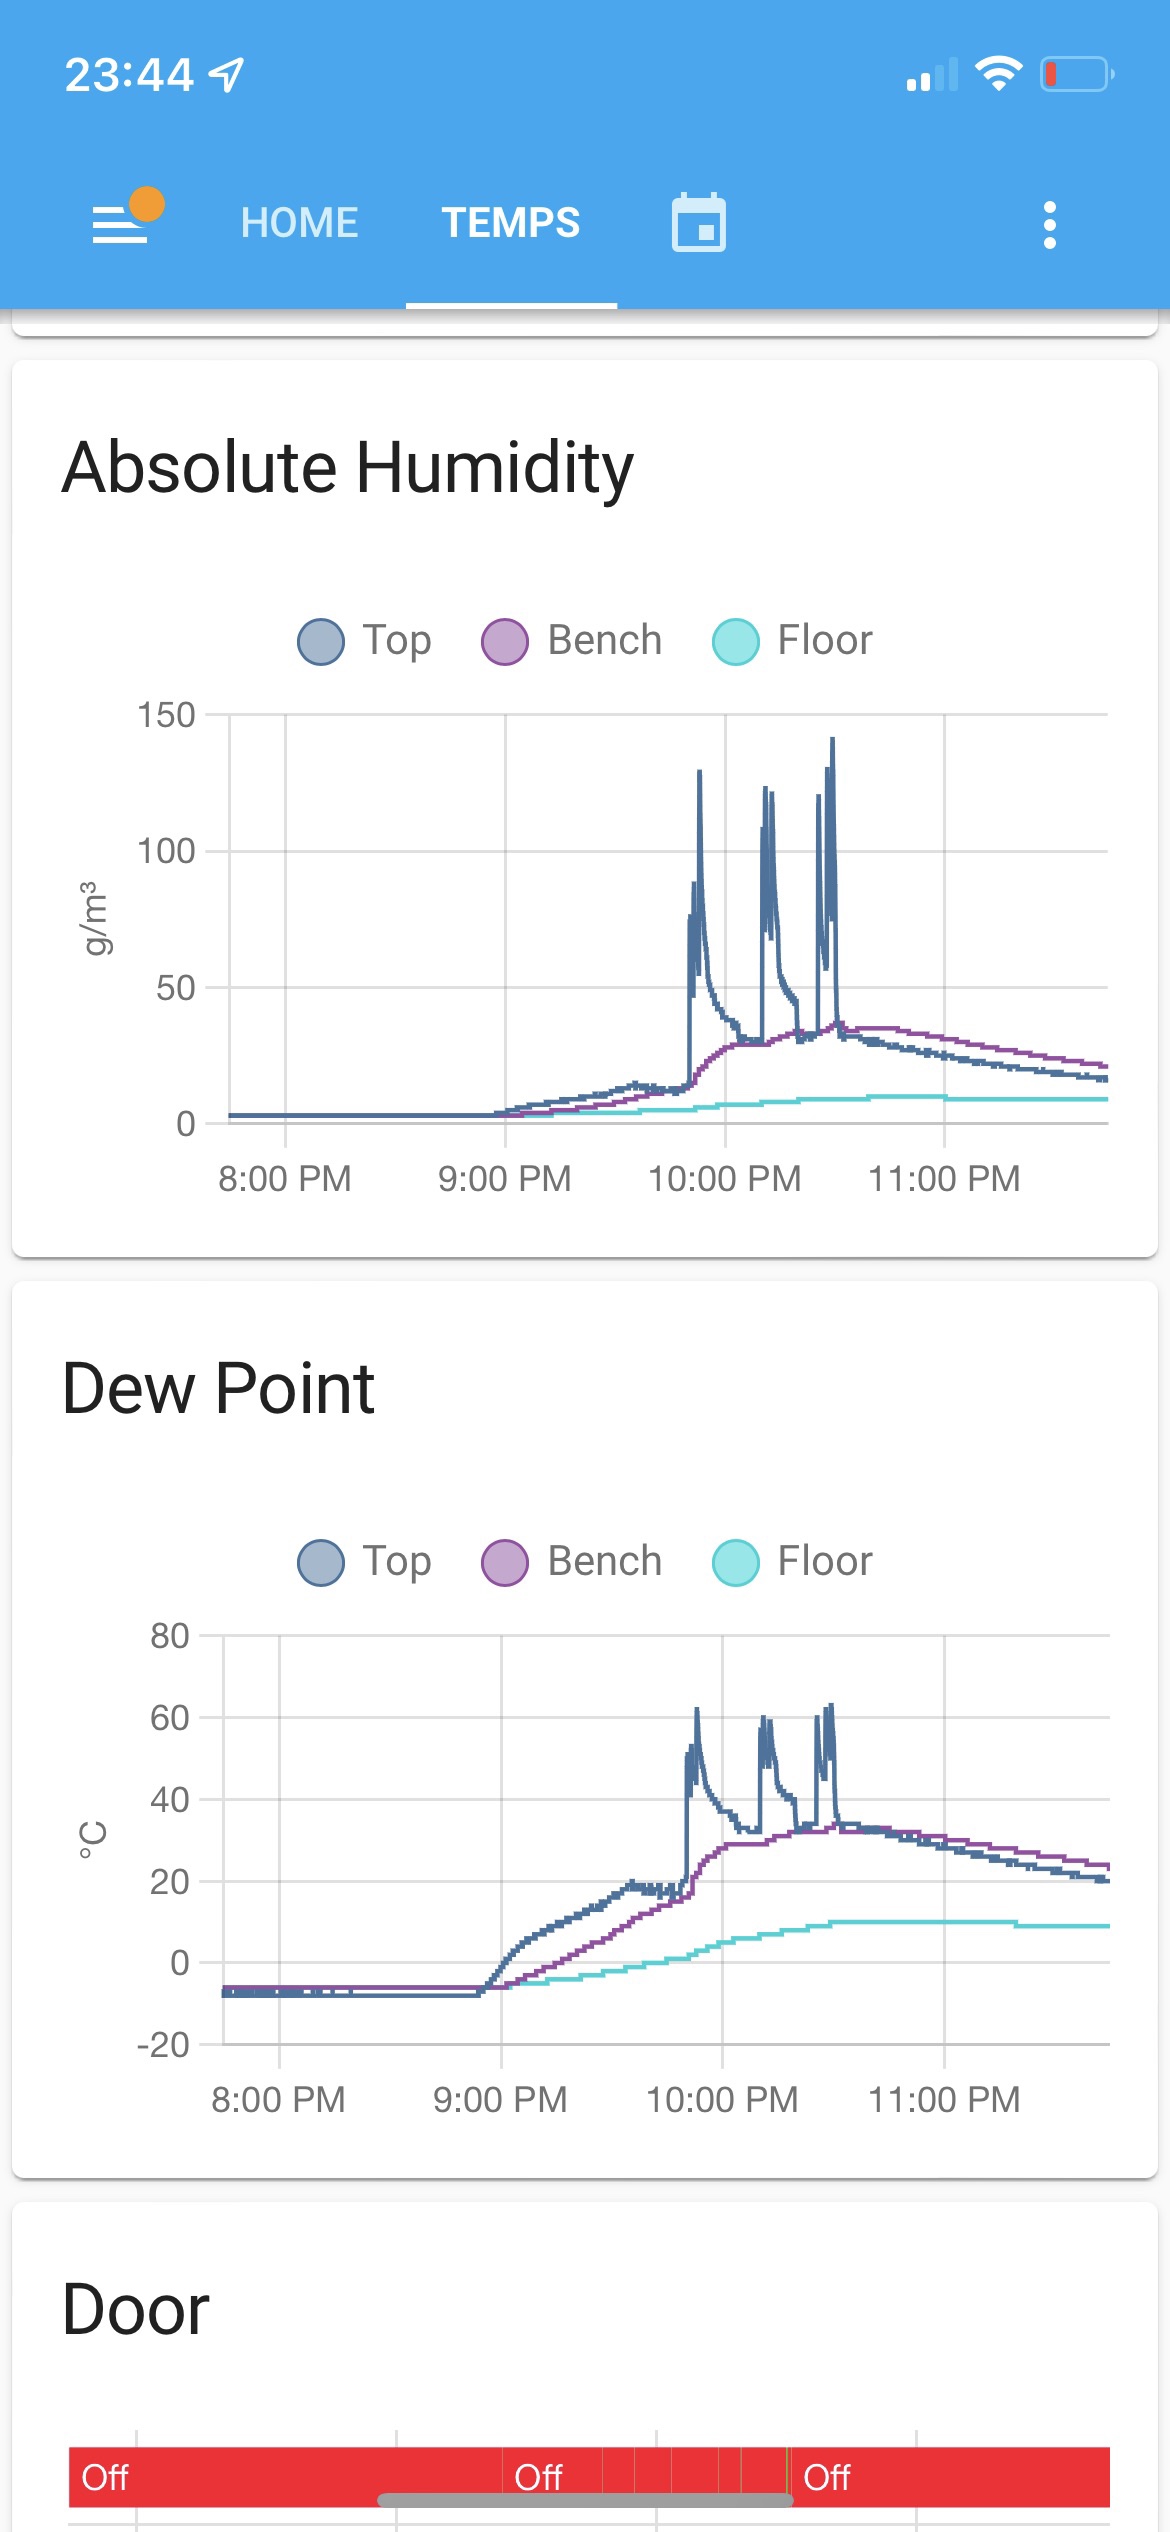
This setup has proven to make a bit more difference as can be seen in the graphs below. Temperature-wise, not much happens on the floor level because the floor sensor is below the exhaust and is probably affected by the air coming in from the gaps. However, the difference between the top and the bench sensor is now much less: my general observation has been that with this solution, I have been able to “move” about 10c temperature from the top to the bench. In other words, without ventilation, the top sensor temperature would be about 80c and after tuning on the vents, it drops by about 10 degrees and after a few loyly sessions, I am able to get the bench temperature from around 40 to around 50 c. This may feel like a small difference but percentage-wise, it is quite significant as without ventilation the bench temperature seemed to be about 50% of the top temperature and now it is about 70%!
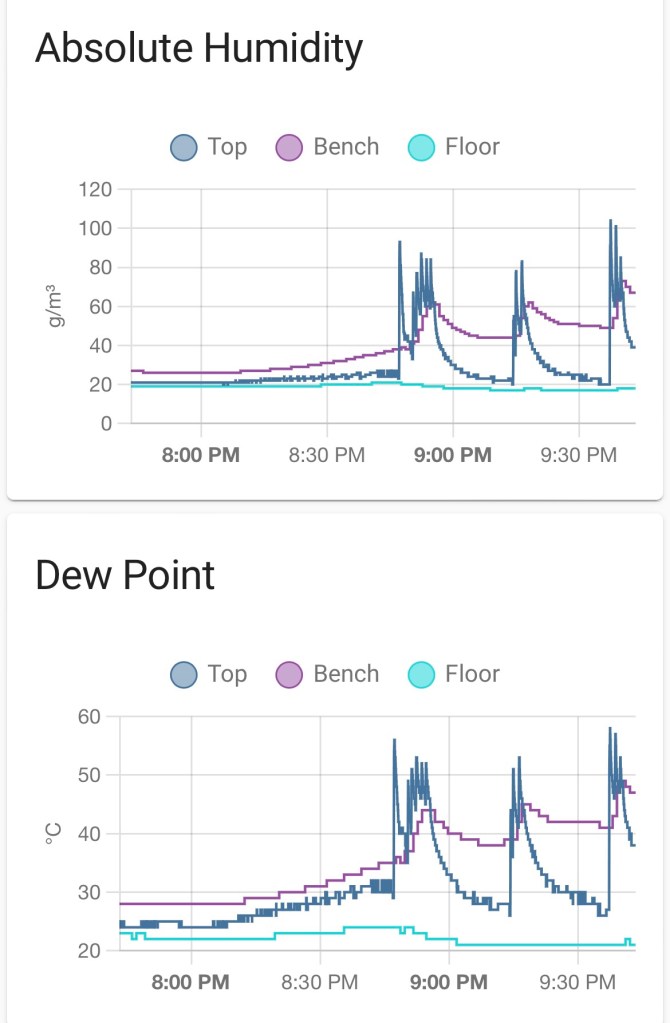
Even more promising evidence can be seen on the humidity sensors where you can see about 10-20g/m3 increase on the bench level when adding steam. That scientifically proves that the steam circulates much better now. The next step is to acquire more responsive humidity sensors to prove this point. Getting AH to close about 50g whilst increasing temperature by ten Celsius actually makes difference because now the dew point increases to above 37c and the steam starts condensing on your skin on the bench level. The steam feels more “fresh”.
Experiment 4 – Continuous ventilation in summer
After about half a year, I’ve concluded that it is best to run ventilation when I start saunaing and keep it running until I finish. I don’t switch off ventilation during cooling breaks.
It get pretty warm and humid where I live so I performed another test in June when it was 102F/39C during the day. The barrel was about 113F/45C when I switched the stove on. When I started saunaing, the outside temperature had dropped a bit below 100F/37C and relative humidity was about 30%.
The readings were quite interesting this time as can be seen below. I managed to get the bench temperature above 65c with ventilation. The floor was still considerably colder but my top sensor is above my head so by keeping my feet on the opposite bench, I’d say the temperature difference between my head and legs was very minimal.
Looking at humidity graphs, you must keep in mind that my bench sensor is leas responsive than the top sensor so the spikes are less dramatic zduring löyly. What you can see though is that th edew point creeps above the body temperature on bench level that makes you think you sweat more (see the About Sauna Temperature and Humidity post). That high dew point temperature definitely makes the steam feel more moist.
Conclusions
After about of six months of use, I’d say that my $100 investment to mechanical ventilation does not seem to go in waste. I feel that I have now successfully reduced heat stratification between my head and the bench very significantly.
Other things to consider
In addition to this ventilation hack, I also added an extra bench that slides in an out. It allows me to sit higher up and keep my feet on the opposing bench. I have also lowered the stove two inches so the benches are now closer to the top of the stove.
Finns were eager to adopt all kinds of mobile applications especially during the heyday of Nokia about 20 years ago. The first SMS controlled stoves came around in late 90’s. After a few burned down saunas, we now have even a European standard SFS-EN 60335-2-53 for safety requirements of such appliances and applications.
But apart from stoves going from SMS controlled to WiFi controlled, IoT hasn’t really made its way to saunas.
But my friend Mo is in sauna automation. He has been working on different applications for a few years already and his first applications included temperature sensors as a backbone and then various applications like opening vents based on the temperature readings and such.
We sat down for a cold Lonkero and started ideating on different possibilities for a perfect sauna app. We quickly categorized our ideas in two buckets: applications that make life easier and provide information and then there was this idea of a sauna buddy, our virtual sauna assistant or friend, if you will. Mo had already been working a lot with the Home Assistant platform so that became the platform of choice.
Home Assistant
Home Assistant is a popular open source automation platform for low code or no code home automation. The beauty of it is the availability of integrations as well as ability to develop comprehensive mobile apps without any coding effort per se.
Integrations in the App
The most relevant integrations in the app are multiple temperature and humidity sensors: one for floor, one on the bench level, one on the top, and one measuring the temperature of rocks. Then there is a door sensor, led lights, and ventilation fans.
With Home Assistant, it is easy to automate common routines like switching the lights on when sauna is ready, or sending a notification in the app when the temperature exceeds certain temperature. The sensors write the status in a MariaDB that can be easily queried for further analysis.
It is also easy to create history graphs and create own measures in the configuration. We have calculated absolute humidity from relative humidity for example because that is a much more relevant metric when analyzing steam in a hot room. From RH, we can also define dew point, that is quite interesting metric to analyze the quality of the steam.
With history sensors, it is also easy to create things like sauna diaries. I track sauna use times and hours as well as the löyly time (time when absolute humidity is above 60 g/m3).
The Sauna Buddy Part
Probably the more interesting part of our app development is the Sauna Buddy part. Sauna Buddy is the virtual assistant that reacts to specific events in sauna.
We discussed the most common interactions in sauna and how to automate that so that we could outsource all that communication to the virtual assistant. It is pretty simple really – there are only five situations in sauna where talking has ever been necessary: 1. Someone keeps the door open (see The “Ovi Kii” Rule) 2. Someone pours water on the stove and you want to compliment the löyly 3. There is not enough steam and you want some 4. Water is out and you need more 5. You need to ask someone to make room for you
We figured that at least situations 1 – 3 can be automated. We started by installing a Google Home Mini speaker below the bench. This speaker integrates effortlessly with Home Assistant and provides multiple interfaces like text-to-speech and voice commands for our future use. It also costs just about $25 so not much harm is done if we need to replace the speaker every now an then.
The lowest hanging fruit was to control lights via speech. We just implemented voice command to switch on the Govee led lights.
The Ovi Kii Logic
The Ovi Kii logic is relatively is relatively easy to implement. We added a magnetic door sensor that detects the door opening event and transmits the status to the Home Assistant server. The automation is triggered when the door is kept open for three seconds and it simply plays an audio file from a predefined folder then.
As for the audio files, we recorded multiple friends’ authentic and friendly recommendations to close the door and the script randomly plays one of those mp3 files randomly.
Complimenting the Löyly
Finns know how to appreciate good steam in sauna. They often compliment whoever poured the water by nodding towards them or buy forming complex expressions like “huh”, “aisssss”, “on se kyllä”. The last one literally means “it is so yes” or something.
Now the task was to make the app be the guy that complements the steam so you don’t have to bother. It is perfectly fine if only one person complements the steam because others most definitely agree anyways.
I installed a few bluetooth thermo and humidity sensors in the sauna earlier to study, how the humidity changes in the sauna during löyly. I wrote the blogh posts Thermo Physics 101 – Sweating in Löyly and Humidity and the Löyly Index to explain, what actually happens in löyly. Utilizing this information, we were able to provide relatively reliable trigger for the app to compliment the löyly: one definition is that humidity increases very rapidly but in our saunas it seems that absolute humidity never exceeds 80 g/m3 unless you add steam and it almost always exceeds that threshold with one ladle of löyly.
The issue with bluetooth sensors is that they react to the humidity change with delay so we had to replace one of the sensors with a wired one that reports a new reading every 500 milliseconds. That is faster reaction time than most Finns have on Saturday evening in their saunas. There were not many wired options available that would integrate with Home Assistant out the box but Mo had a soldering iron and components handy.
Then we simply created a Home Assistant automation that triggers whenever absolute humidity exceeds 80 g/m3 for more than a second.
The Steam Escapes Logic
As discussed in the The “Ovi Kii” Rule post, keeping the door open is a big disgrace but opening the door during löyly is a murder so we copied the Ovi Kii automation and added humidity conditions there: if the humidity is low, then we just semi-politely ask to close the door but if the humidity is high, then the tone is more aggressive.
The More Steam Logic
This automation kicks in when absolute humidity drops below 60 g/m3. Currently the app just asks to add water on the stove if the stones are hot enough to generate the steam. We put a thermo sensor on the stones and said that the stones must be at least 150C hot. Ideally the stones should be above 200C but 150C is still enough to generate decent steam in my sauna.
Ventilation
I also implemented mechanical ventilation in my sauna. The fans are very simple: they turn on when you plug them in so I just needed to get smart plugs from Govee to integrate them with Home Assistant. Then it is easy to switch the fans on and off based on different events in sauna. I tried for example automation where the vents started running when the sensors detected steam. Currently it seems though that it is better to have the inflow on before you add steam for better air circulation. Maybe there is room for some predictive automation.
Future development
The next step is to implement a water dispenser that could be voice activated. This should be easy to do by adding a WiFi controlled valve (think Rachio but simpler) and then activate the valve via the Google Home speaker using voice commands.
When you are locked down at your home for almost two years, have lonely sauna sessions five times a week and have humidity sensors, you start pondering the scientific side of löyly. Or I have…
The basic concept of löyly is of course that you pour water on the stove and it vaporizes and increases air humidity. Finns judge saunas by the quality of löyly. Good löyly is often subjective assessment and can be based on anything: hot scorching steam that burns your skin or gentle warm humid air that slowly hits you. Or anything in between. Bad löyly seems to be bad either because the löyly is so weak that you don’t feel it or it won’t last long enough or it is too hot and scorching so called “dry electric sauna löyly”.
But what determines technically the state of löyly in sauna? When does it start and when does it end?
One approach to answer this question would be to determine some relative humidity range in sauna where you could say you are in the löyly. You may have heard someone saying that their sauna is very humid because the humidity is 40%, for example. The challenge is that relatively humidity is the percentage of maximum humidity in certain temperature. So 40% humid air at 65C air means that there is about 70-75 grams water in a cubic meter or air. 40% humidity at 85c means 155-160 grams water in a cubic meter. This is discussed in great detail in my earlier About Sauna Temperature and Humidity post.
To the Sauna Lab!
Below are temperature, absolute humidity (AH) and relative humidity (RH) readings of three different sauna days of mine in Texas between August and October 2021. You will also see that naturally the outside air temperature and humidity varies day-by-day, which has an impact on the readings in my outside sauna.
The on the left (sauna day 1) was a hot and humid day with 40% RH on floor level and the temperature inside the sauna was about 40c when I started heating it. As you can see, the RH starts dropping quickly as we heat up the sauna but interestingly, absolute humidity increases. I don’t know why that happens though. This was my typical three-session sauna day where I went in at 70c and poured maybe two cups of water. Absolute temperature went from about 90g to 110 after the first ladle and then to 120g. Then I enjoyed löyly and cooled off. When I went back to sauna, the AH was back at about 90g and went up to 110. I had switched off the stove at this point. At thir sessions, the starting humidity was maybe 80g and went to about 100g as the stones got colder and could no longer give the steam.
The second sauna day was also hot but less humid as RH was “only” 40% in the beginning. This time I went in a bit later and the sauna had switched off. You can see how the temperature started dropping after adding löyly. I then switched the stove on again so you can see the temperature climbing up again. This time it seemed that the AH atthe beginning was about 70G and only got up to 95g. Maybe the stones were already bit colder because I eventually got AH to almost 120g.
The third sauna day was a “cold” fall day in Texas. The outside temperature was in low twenties in centigrade. This timel, you coul observe quite radical AH increase from 60g to about 110g during the first löyly. The temperature also rose by 5c so the stove was on all the time. It seems that the relative humidity change was less radical but that is because the scale is different on the third picture – in all sessions, the relative humidity went from low 30’s to mid 40’s. On the third sauna day, you can see that the stove was off during the third session because the temperature kept falling.
Löyly Index
What I can see of the graphs (and I have tens of these), I can determine that a good löyly begins when absolute humidity increases by 20 g per cubic meter or more in say 5 seconds. It is more difficult to say when the löyly ends by reading the graph but technically probably when AH drops back to the starting AH. In practise, most people would feel that the löyly ended earlier though. Maybe it is fair to say that löyly ends when AH drops about 20g/m3 from the peak. Every sauna is different though and I feel that the löyly lasts very long in my sauna and it is more intense than in many other saunas I have been to.
Why would all this matter? Two reasons: 1. The readings illustrate why you cannot tell pretty much anything about sauna air based on relative humidity meter. Also if you have one those sauna thermometers, the hygrometer probably shows whatever anyway. In these test, the sensors were tested and should have been +/- 3% accurate.
2. These findings can lead to scientific breakthrough in the area of sauna automation as you can read below.
Me and my fellow sauna scientist buddy @momanse have been trying to figure out when the löyly begins and ends to use this information on some sauna automation applications.
The first prototype is complementing a good löyly is already in rigorous testing. When the sensor thinks that we got some löyly in the room, the speaker plays authentic Finnish-language complement on a nice löyly. No words necessarily but an “Aissss!” sound.
The next phase is to play an audio file to ask for more löyly when we determine that the previous löyly has ended. Also very common small talk in a Finnish sauna.
I know that some sauna purists hate all kinds of technology in sauna but these applications would have been appreciated by my forefathers hunders of years ago. The technology eliminates the need to talk and outsources all social interaction to a computer . Silence is gold but if there needs to be communications, let the computers handle that.
I prefer dark saunas because they help me relax better. However, it is good to have some hue in the steam room to avoid accidents. My sauna kit came with a led bar that was supposed to be installed behind the stove. It was too bright to my liking so I started looking for alternatives.
My first iteration was to sink a few submersible led lights to the water buckets. This is actually a very affordable idea and they add a nice touch. Water in the bucket keep the lights from overheating.
The issue with the submersible lights was that you have to change the batteries quite often and remember to switch them off. I then started looking at led lights. I had already something similar in my kitchen so I just needed to find something waterproof. I first went with the first waterproof led strip I could find. They came with a bluetooth-enabled app but I wasn’t very happy with the light effects as the leds could not transition from one color to another without a blink in between. Another issue was that these could be only controlled via Bluetooth, which makes things harder if you want to play with home automation.
Then my friend found inexpensive WiFi enabled Govee lights from Amazon. It turns out that these have the best aurora borealis led effect I’ve seen. They also work over WiFi and support Google Home assistant and Apple Shortcuts also work with home assistant so now I had a path to automate lights based on whether the stove was on or off and simply add Apple Shortcuts for Siri to turn the lights on and off in my sauna.
As for the installation, I have a small barrel sauna and the heat stratification is pretty significant, which also means that the floor doesn’t get very hot. So I felt comfortable just running the led strips under the benches and and under the door from one side to another. This way the lights are also indirect, which works better for me. One other benefits of the leds is that you can very easily dim the brightness to your liking.
For some reason, hot tubs became very popular in Finland in early 2000’s. Companies rent them on trailer for parties and many have added one on their backyard or at their summer place.
I believe this popularity has something to do with our culture of sauna evenings, a tradition a will write about a bit later. The basic idea is to spend the whole evening in the near vicinity of a sauna drinking beer with your friends but since no one can be in a sauna for 4-5 hours, there must be something else to do.
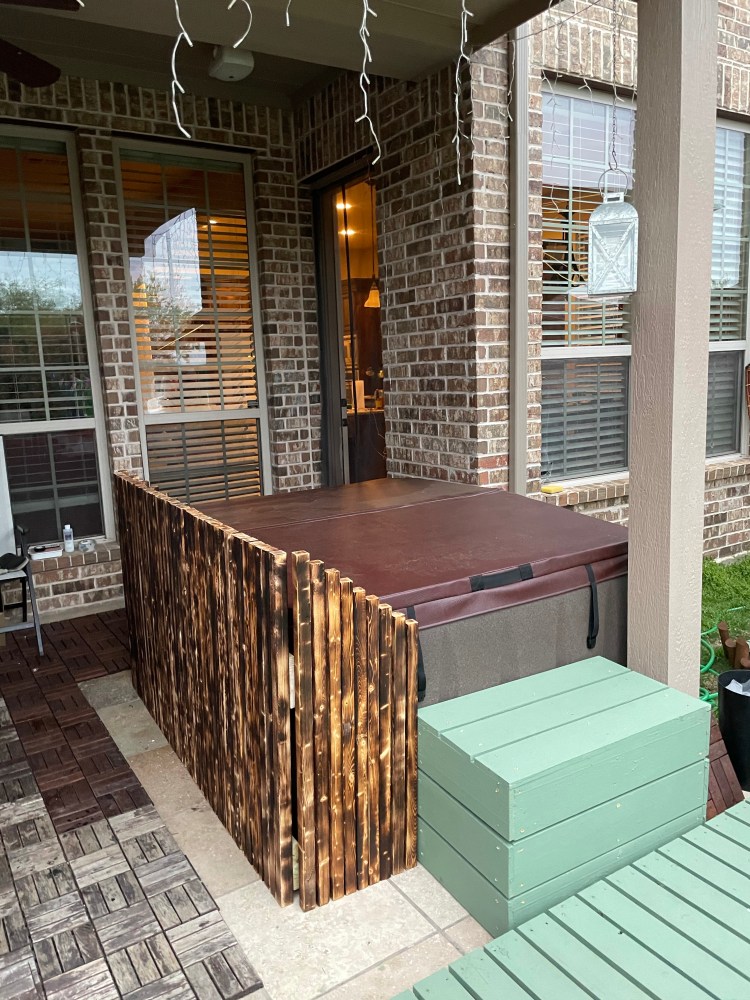
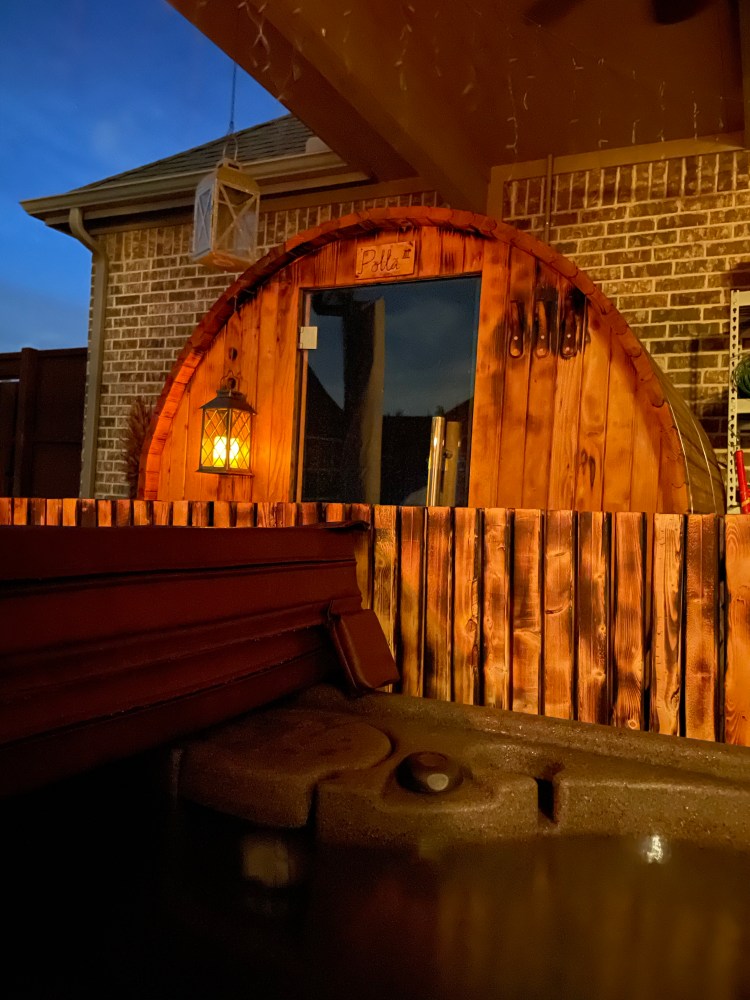
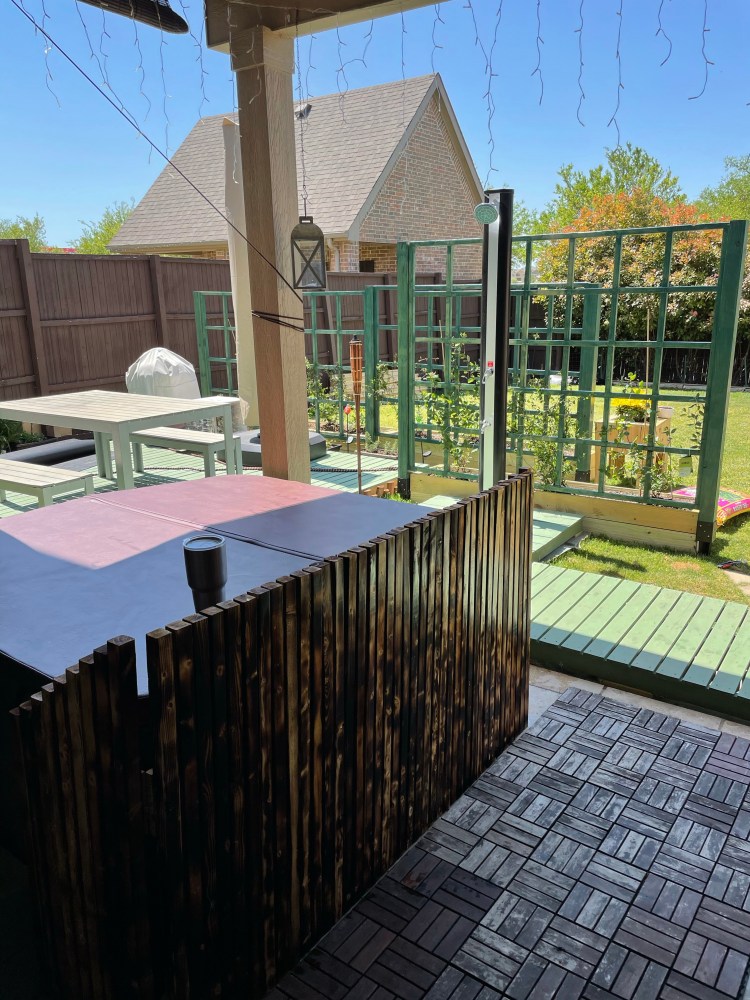
The authentic Finnish palju is often a barrel-shaped and made of wood and it is heated up with a wood-fired oven. Since, I couldn’t add anything like that on my backyard, I just went with a regular hot tub. I didn’t particularly like the grey vinyl casing of my hot tub so I went ahead and made a wooden fence around it. It works better for my feng shui when I see that wooden fence from my sauna instead of some cheap plastic.
For longer hot tub sessions, I added a TV to the corner.
Hot Tub Chemicals and Sauna
The challenge with these hot tubs is that it takes quite long (up to 20 hours) to heat up the water to 100F degrees so you cannot throw the water away after every use. Instead, you keep the water there and put an insulated cover on the top and then throw 10 different chemicals in the water to keep the water clear: warm water provides favorable conditions for bacteria to grow.
Well, the chemicals are not much different than the ones we are used to in swim pools already but when you combine hot tub plunges with sauna, you should know that you should rinse well between the hot tub and the sauna because otherwise those chemicals will evaporate and breathing in those chemicals is not the best idea. Therefore, you should add also a garden shower to your setup.
When it comes to my favorite sauna routine in winter, I like to take a cold plunge first, then go to sauna, then another cold plunge, then hot tub, rinse, back to sauna and repeat.
People commonly ask if you should shower before sauna. Generally, yes you should as it is more sanitary. It’s sad to see people going in to gym “saunas” wearing their sweaty shorts and shirts and even shoes.
My sauna is on a patio and while it is not difficult to take a shower before going in to the sauna, I decided to add a garden shower. This was important also because I wanted to be able to go from sauna to hot tub and back and it is a good idea to rinse that bromine or chlorite water in between.
As with anything, you can go to extremes and get a plumber to add a fancy shower on your back yard or just use a garden hose to rinse. I wanted to add something stationary and elegant but I wasn’t prepared to donate my left kidney for a shower.
So I found a 7ft tall shower that I could just mount on the patio and connect it to a garden hose. The pole works as a reservoir that heats up the water in summer but I’m 100% certain that it will not work in winter. That’s ok though. In winter, I can take a quick warm shower before going to sauna and after sauna or hot tub a cold shower feels good anyway.