
Note: I was asked to write a similar blog post to Saunologia.fi. You can see the post on their site at https://saunologia.fi/improving-a-barrel-sauna-a-case-study/. The findings are similar, but that article is a bit more condensed.
Barrel saunas are popular especially in North America. They are rather easy to fit on backyards and also relatively inexpensive and they look cool.
One challenge with this sauna design is ventilation and heat stratification. While the basic rule of löyly (steam) in Finnish saunas assume that your feet are above the top of the stove for better heat and steam experience, in barrel saunas you keep your feet on the floor. Another design choice in barrel saunas is that ventilation is often implemented using gravity based ventilation where air intake is on the floor level below stove and the exhaust is on the opposed wall on the top. This is probably the only meaningful way to implement proper ventilation without mechanical components but the downside is that this solution often creates draft on the floor and it further increases heat stratification.
I cannot really say that I was bothered by any of these ventilation or stratification issues but multiple threads in different sauna groups in Reddit and Facebook prompted me to look into this.
Electric Sauna Ventilation in Theory
There are multiple quality articles about sauna temperatures and ventilation available online. I’ve found these masterpieces the most useful:
- Saunologia.fi – Finnish Sauna Essentials Part 5 – Air quality
- VTT Research – Temperature and ventilation of the Finnish Sauna, 1992 (in Finnish)
Temperatures and humidity without mechanical ventilation
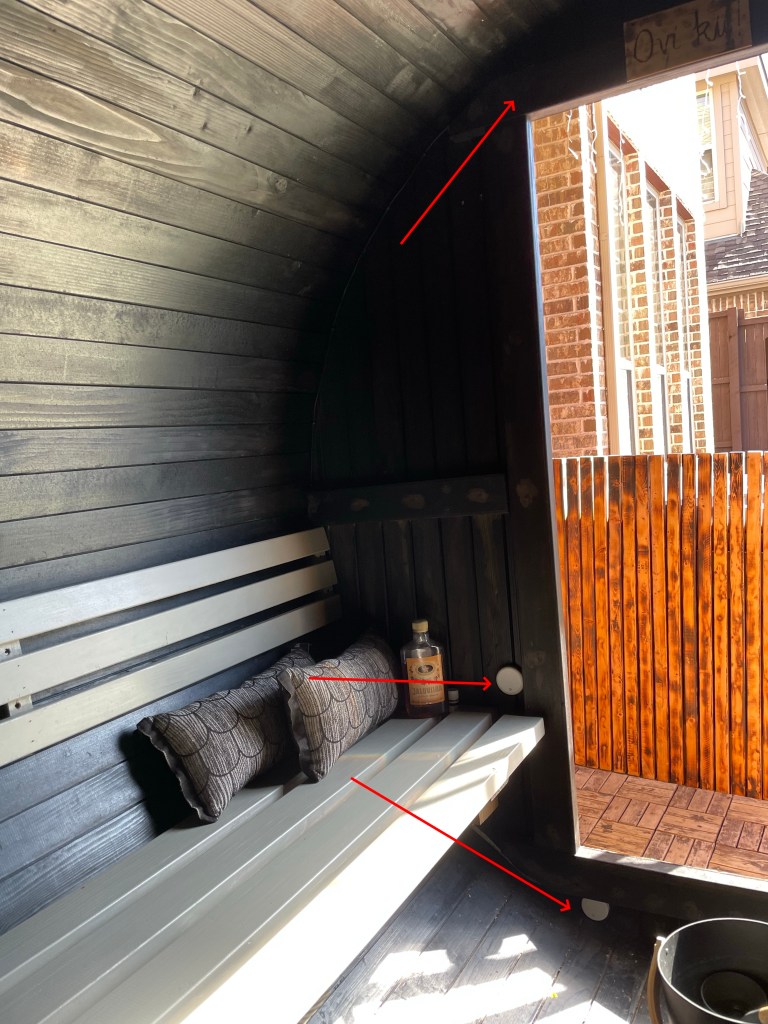
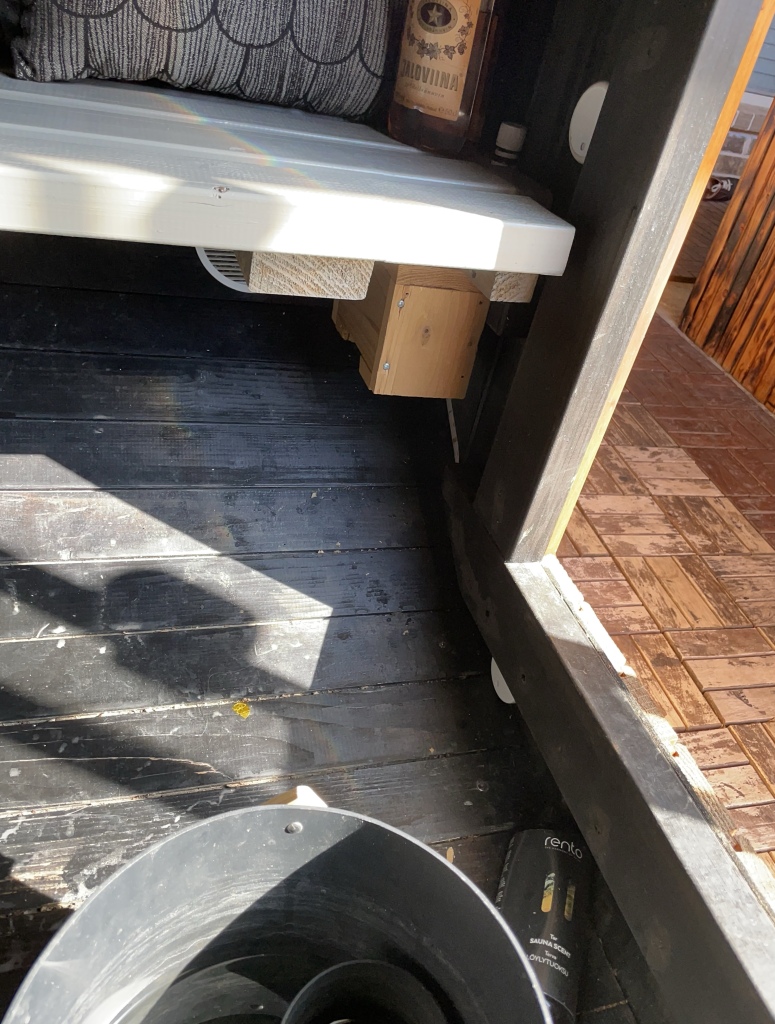
I have three temperature and humidity sensors in my sauna as illustrated below. These sensors write their readings to a MariaDB. The top sensor writes two values per second whereas the Bluetooth sensors write in about five-second intervals.
Experiment 1 – standard ventilation
For starters, I measured temperatures and humidity first by using regular ventilation: cool air was sucked in from below the stove and I kept the exhaust vent closed so the air escaped from the gaps as air pressure increased after adding steam.
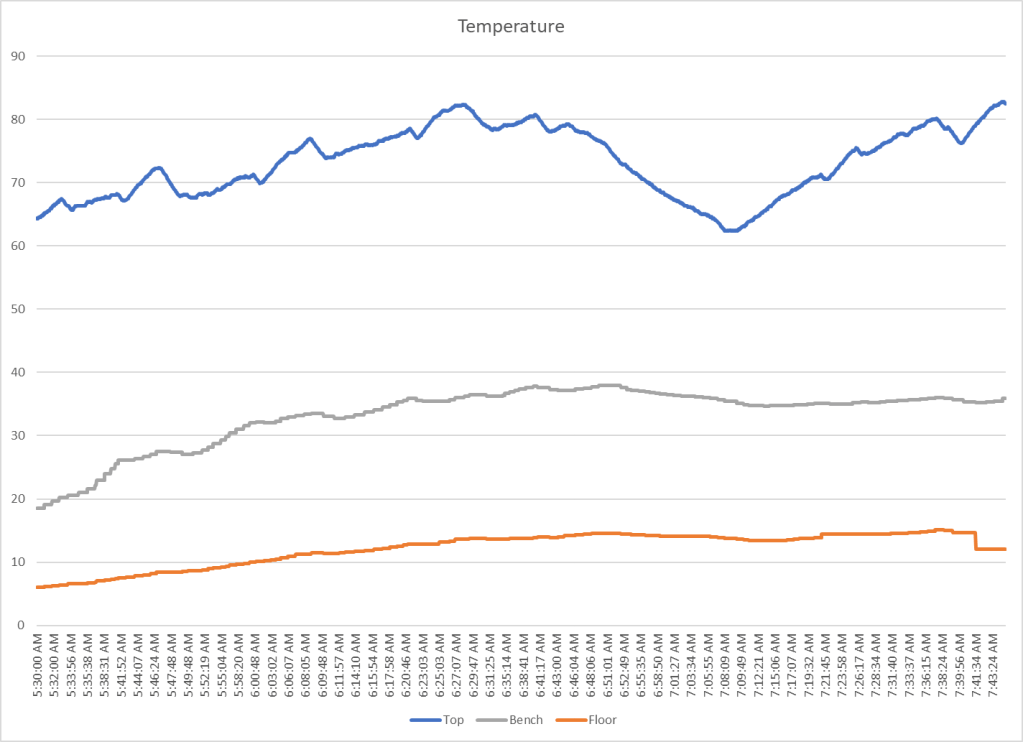
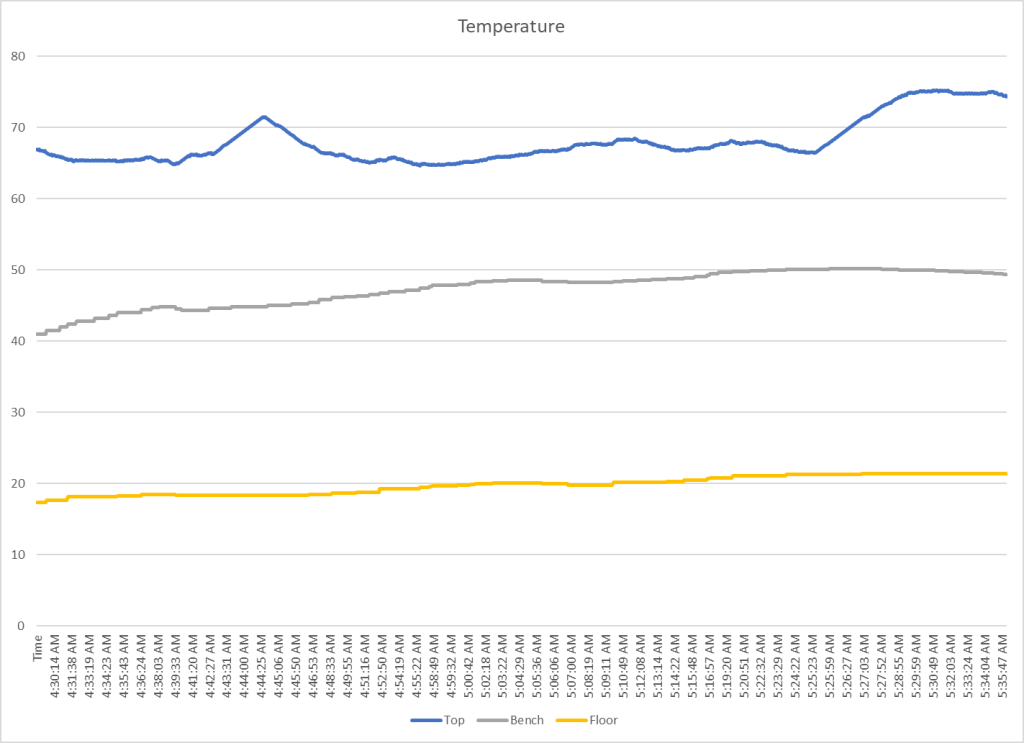
Below you can see the temperature graphs of a typical sauna session. You should notice about 40c difference between the top and the bench level. Floor is typically 5-10c warmer than outside air and in this session outside air was a few degrees above freezing. I shut down the stove in the half way and you can see, how the temperature starts dropping quite quickly on the top sensor but not so much on the floor or on the bench level. The challenge is to get the bench level temperature to above 40c especially in winter.
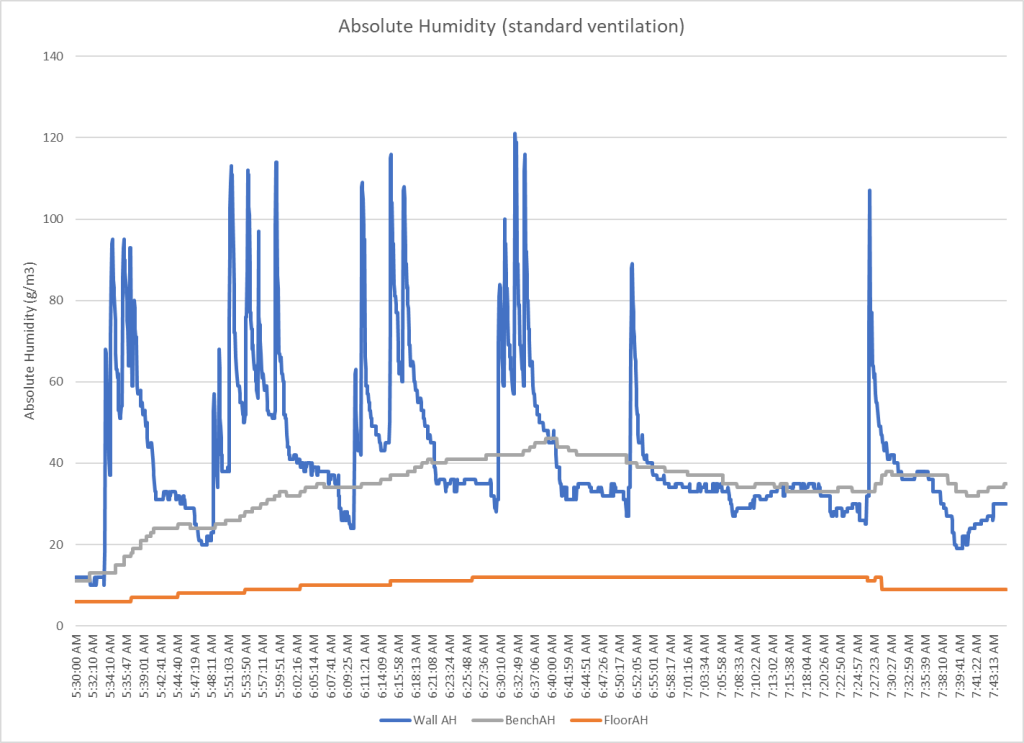
Looking at the humidity graph – you can see the readings in the top sensor spiking as I add steam. The bench sensor indicates that not much happens on that level. In other words, the steam goes to the roof level and stays there until the hot and humid air escapes from the gaps.
Mechanical Ventilation Implementation
My conclusion after reading different articles of ventilation was that mechanical ventilation is the only viable way to go with electric saunas. In Finland, people don’t really think about this because electric stoves are mainly used in apartments and you must implement mechanical ventilation there anyway. You can still build it wrong, of course.
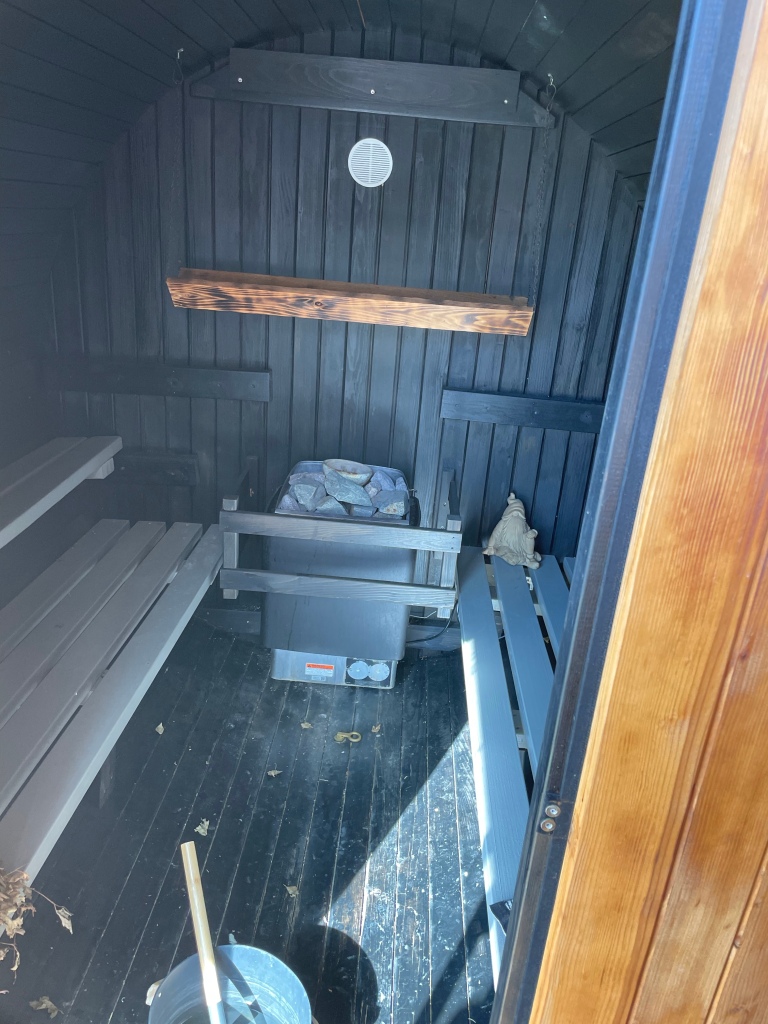
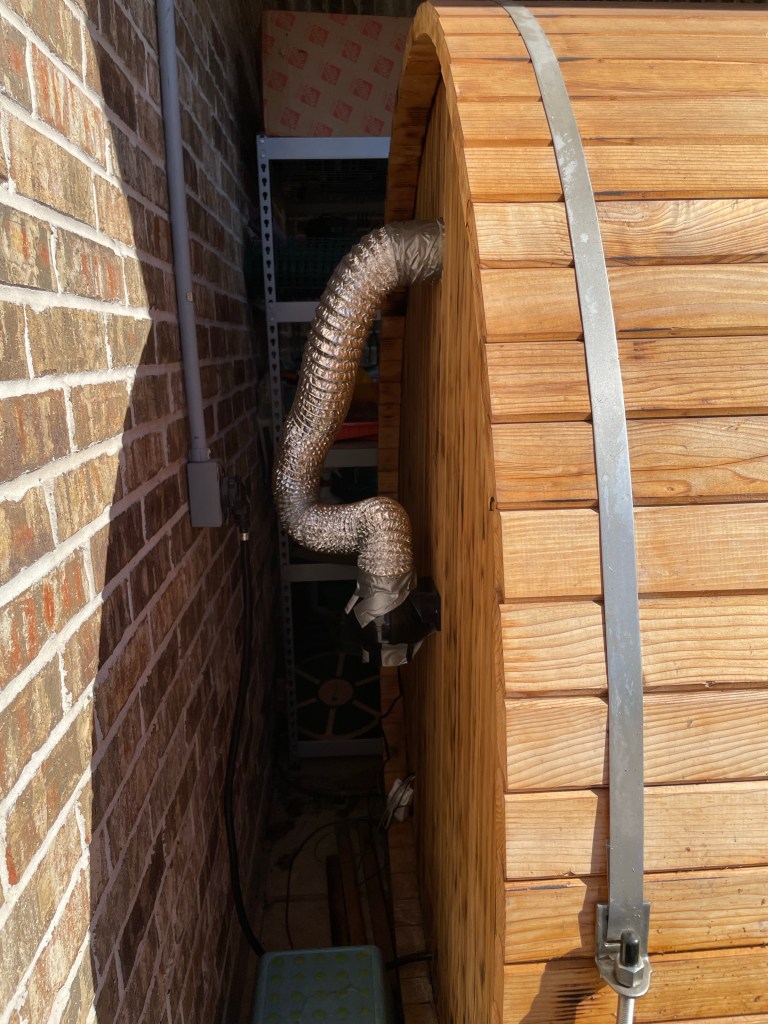
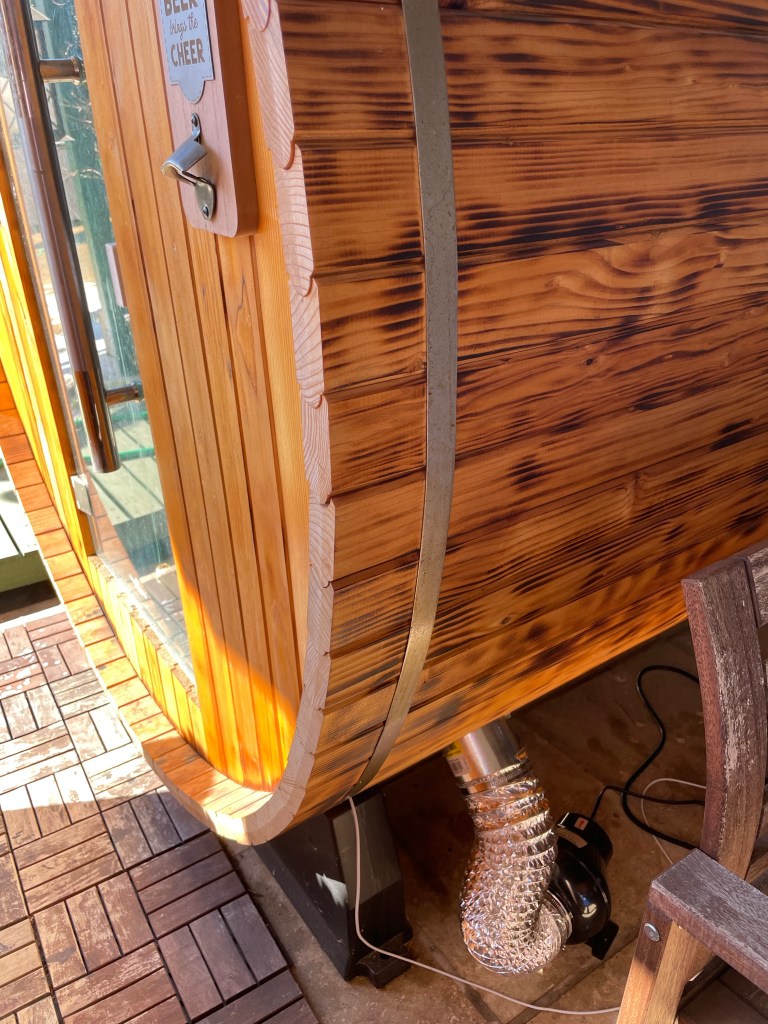
My idea was to bring fresh air above the stove mechanically using a 195 CFM fan from Vivosun ($30 investment). I then got a few WiFi plugs so that I could turn the vents on an off using my sauna app. Unfortunately, these fans are not adjustable so the only ways to control the flow would be by installing adjustable vents and by turning the fans on and off.
The fans are able to circulate 195 cubic feet air per minute which is about 90 liters per second. I haven’t found specific guidance on the ideal air circulation but some sources suggest 3-7 liters per m2 per second. This barrel sauna is about 3.2m2 in the middle so in any event 90 liters is probably way too much.
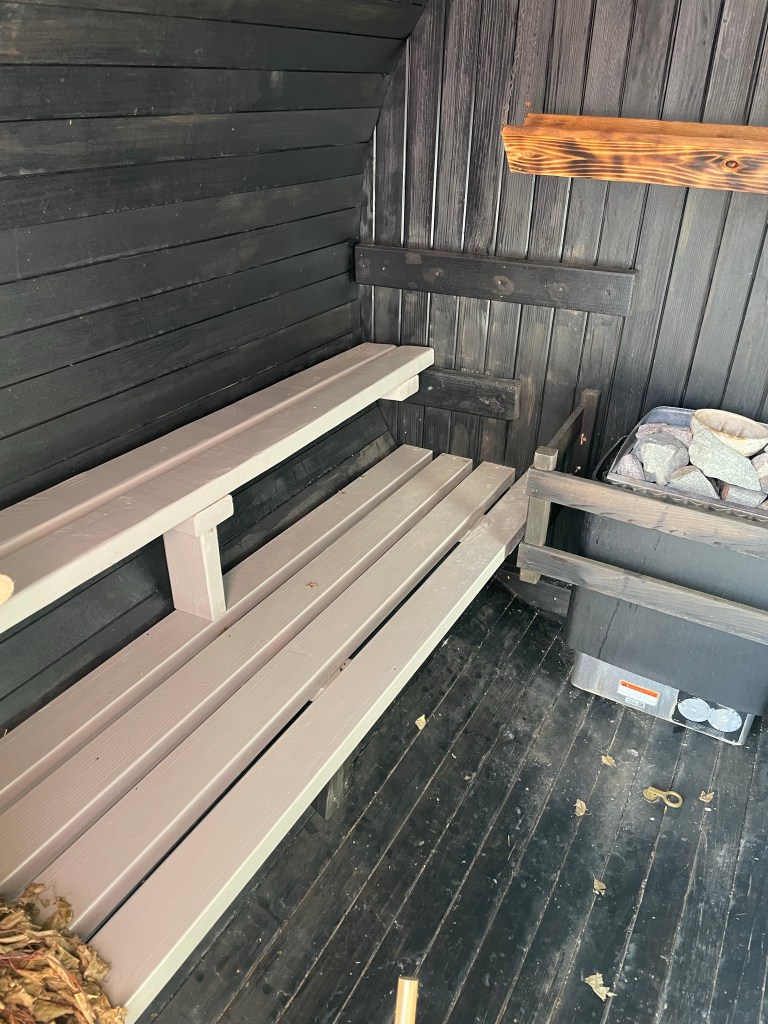
I added 4-inch vents above the stove and on the floor on the opposite side as illustrated in the pictures below. The location for the exhaust vent is a bit tricky due to the shape of the sauna. Somewhere on the lower part of the door would have been more ideal, but not very practical :).
Experiment 2 – timed ventilation
My first experiment was to keep the vents closed during the heat up and then use home automation so that both fans start running for 60 seconds when the top sensor detects steam.
While mechanical ventilation seemed to improve air quality (the air felt more fresh), there was little to none impact in sensors. However, this might also be because my bench sensor is a Bluetooth sensor and it is less reponsive than the top sensor that is hard-wired.


Experiment 3 – Continuous ventilation
The second experiment was to switch on both vents when I started saunaing. I have also tried to keep the ventilation on while heating up the sauna but that doesn’t seem to do much else than lengthen the heat-up time.
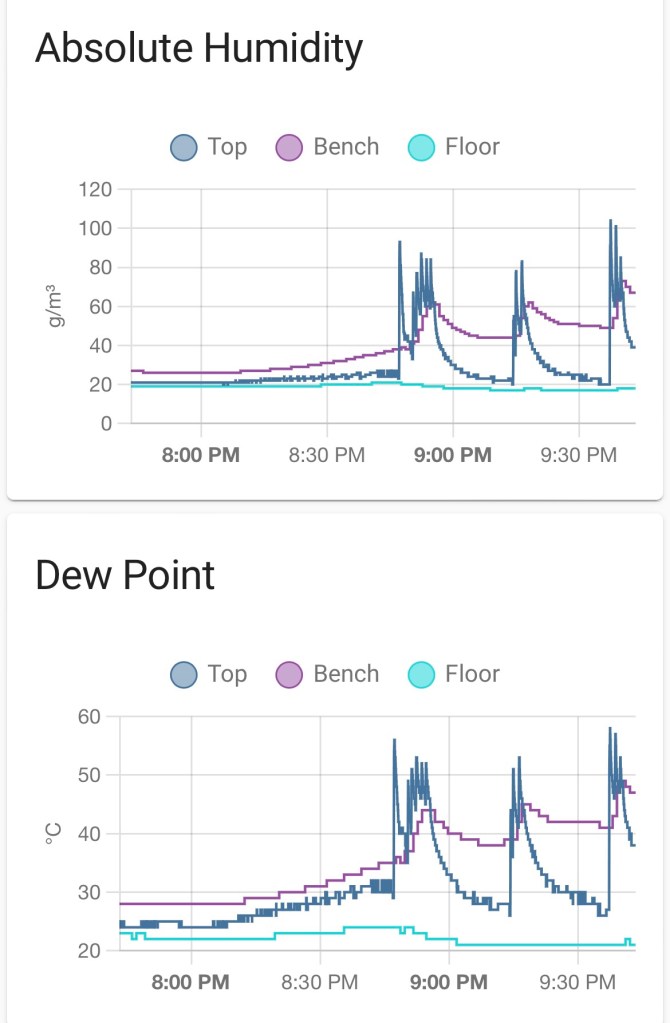
This setup has proven to make a bit more difference as can be seen in the graphs below. Temperature-wise, not much happens on the floor level because the floor sensor is below the exhaust and is probably affected by the air coming in from the gaps. However, the difference between the top and the bench sensor is now much less: my general observation has been that with this solution, I have been able to “move” about 10c temperature from the top to the bench. In other words, without ventilation, the top sensor temperature would be about 80c and after tuning on the vents, it drops by about 10 degrees and after a few loyly sessions, I am able to get the bench temperature from around 40 to around 50 c. This may feel like a small difference but percentage-wise, it is quite significant as without ventilation the bench temperature seemed to be about 50% of the top temperature and now it is about 70%!
Even more promising evidence can be seen on the humidity sensors where you can see about 10-20g/m3 increase on the bench level when adding steam. That scientifically proves that the steam circulates much better now. The next step is to acquire more responsive humidity sensors to prove this point. Getting AH to close about 50g whilst increasing temperature by ten Celsius actually makes difference because now the dew point increases to above 37c and the steam starts condensing on your skin on the bench level. The steam feels more “fresh”.

Experiment 4 – Continuous ventilation in summer
After about half a year, I’ve concluded that it is best to run ventilation when I start saunaing and keep it running until I finish. I don’t switch off ventilation during cooling breaks.
It get pretty warm and humid where I live so I performed another test in June when it was 102F/39C during the day. The barrel was about 113F/45C when I switched the stove on. When I started saunaing, the outside temperature had dropped a bit below 100F/37C and relative humidity was about 30%.
The readings were quite interesting this time as can be seen below. I managed to get the bench temperature above 65c with ventilation. The floor was still considerably colder but my top sensor is above my head so by keeping my feet on the opposite bench, I’d say the temperature difference between my head and legs was very minimal.

Looking at humidity graphs, you must keep in mind that my bench sensor is leas responsive than the top sensor so the spikes are less dramatic zduring löyly. What you can see though is that th edew point creeps above the body temperature on bench level that makes you think you sweat more (see the About Sauna Temperature and Humidity post). That high dew point temperature definitely makes the steam feel more moist.
Conclusions
After about of six months of use, I’d say that my $100 investment to mechanical ventilation does not seem to go in waste. I feel that I have now successfully reduced heat stratification between my head and the bench very significantly.
Other things to consider
In addition to this ventilation hack, I also added an extra bench that slides in an out. It allows me to sit higher up and keep my feet on the opposing bench. I have also lowered the stove two inches so the benches are now closer to the top of the stove.


Hello!
Your posts are excellent! They gave me a lot of insight it perfecting my sauna. I have a few questions and would like to pick your brain. I bought a sauna off alibaba and customized the box with a mechanical venting system. I’m using a combination of cabinet fans, usb fans, and a 8 inch fan designed for a grow tent. I have Ruuvi sensors and have been monitoring the temps and humidity during sauna sessions. The temps on the Ruuvi don’t match my other sensors for the heater and temp probes in the room. Not sure how to get accurate data. Would like to discuss your thoughts about my vent scheme if you have time.
Nick
LikeLike
Always happy to read about different saunas. I’ve also found that r/sauna at Reddit and the “Sauna design, construction, use, and Enjoyment” group in Facebook are good forums for testing ideas. Some members there seem to have much more experience and knowledge than myself 🙂
Ruuvi forums should have instructions to calibrate the sensors for humidity.
If the temperatures are off (and the sensors are at the same level height-wise),maybe try with boiling water, how much the other sensors show (if they are water resistant, Ruuvi is obviously not). That way, you can at least tell, which sensor is right.
As far as the hygrometer goes, I would probably ask Ruuvi, how accurate the readings are at normal sauna temps.
I’ve taken the approach where I don’t think any of my sensors are accurate, but I trust they are relatively speaking accurate between each other.
Right now, I see that my cold sauna temperature variance between different sensors is within 0.2C and absolute humidity within 1g/m3. The differences increase significantly when I heat up the sauna because of heat stratification, of course.
LikeLike
Hey! Thanks so much for documenting your process. I have used your posts as a playbook for getting my barrel setup together. Would you have done anything differently now with the ventilation having had it for a year? I’m also personally not bothered too much with the temperature difference between my head and feet, but the fresh air sounds nice. Is it worth the extra hassle? Also, did you put in one 4″ supply for the 4″ mechanical exhaust? Did you close any of the other holes that came from the factory? Thanks for your input.
LikeLike
I can feel the difference especially if I keep my feet on the opposite bench: with ventilation on, I feel the extra heat on my feet and the temperature on my head level drops, which is convenient.
More interestingly, ventilation seems to increase dew point on the bench level to about 40c so the whole experience feels better when pour water.
After one year, both of the original fans have died and I have replaced them with another model that seems to be quieter too.
The setup is pretty simple. Two fans: one for intake and another one for exhaust, original vents covered and regular 4” duct
LikeLike
https://a.co/d/4yAaHX5
Here’s the new fan I bought
LikeLike
Got it! Thanks.
LikeLike
Just to the point of adding our vents….what size did you put in?
Do you have a product recommendation for the vents?
Our sauna is totally hand made…
LikeLike
I didn’t really worry about it: just got cheap vents like these from Home depot:
https://www.homedepot.com/p/Master-Flow-4-in-Eave-Vent-for-Bath-Exhaust-BFEV4/100396926
I also used this kind of duct. It’s not optimal, but in my case the fans are more than powerful enough to exchange enough air in my small sauna:
https://www.homedepot.com/p/Everbilt-4-in-x-8-ft-Flexible-Aluminum-Dryer-Vent-Duct-BTD48HD/203626496
LikeLike
Thanks for this it is awesome! You specifically mention this is for “electric heaters” – how would this be different for wood sauna heaters do you think (if at all)? I am building a barrel and have an M3 Harvia … let me know any thoughts!
LikeLike
Hey there curious if this would change if using a wood based sauna heater? Eg like the Harvia M3 …. I’m a newbie here and designed/in process of building my own barrel … was a bit discouraged once I found trumpkin’s stuff about how barrels are bad but encouraged to see your work to improve barrels ventilation/deal with heat stratification! Let me know any thoughts 🙂
LikeLike
Traditional heaters are quite different. The heater itself creates vacuum in sauna, because you need oxygen to burn wood. This means that the stove sucks air in from the bottom via that ash tray under the fire. Ideally you would bring the fresh air above the stove and, at least theoretically, the steam and heat creates over pressure in sauna to the air should escape also one the floor level exhaust vent if you put one there.
Hopefully this article translates well with Google: https://saunologia.fi/saunan-painovoimainen-ilmanvaihto/
LikeLike
Cool thanks so much for your quick reply, I’ll check it out, that makes a lot of sense & that article you linked is super helpful!
LikeLike
I really enjoyed your article. I have been wondering if I need any vents at all in my barrel sauna that I hand built with cedar 2x4s with a wood-fired HUUM hive heat stove (wood fed from inside). It’s always felt very comfortable and the löyly always seems great. I’ve noticed however that my bench sensor and my upper sensor seemed to read too low a temperature compared to what I was actually feeling. After reading your article I decided to remove the weather strip from the bottom of my 24″ wide door before adding any vents. At 1/2″ high, it’s an area almost exactly the same as a 4″ circular opening. My bench temperature now averages around 65C/150F instead of 50C/125F and the steam comes down on to our faces more quickly which is great since I made our benches with adjustable backs so we can lay down and keep our feet off the floor. Interestingly, the upper temperature has also gone up and now is routinely at 80C/175F to 90C/195F even with temperatures outside well below zero. I wonder if the temperature is really that much warmer or if some of this comes from the fact that much less air is seeping in between the staves now that there’s fresh outside combustion air flowing freely from under the door.
LikeLike
Interesting article providing very useful data improving barrel saunas.
Have you considered lowering the fresh air supply closer to heater? Might force heat rising from the stove lower preventing stratification? Just wondering….
What’s plank hanging above the heater? Heat/steam spoiler? Making a difference?
LikeLike
Thanks for your review
My thinking is that the air from outside is colder (and thus heavier) that the air inside, so theoretically pushing it as high up as possible should reduce the temperature on the top most. However, I think that in practice, the two vents just create circulation in the air that mixes hotter air from the top with the colder air on the bottom and lowers stratification.
There are other reasons to put the inlet vent about 3 ft above the rocks: it is to mix the steam with some fresh air and oxygen so that when you breath the steam, it feels fresher. That might be a placebo effect, but there are other pages in the blog explaining the ventilation in more detail.
The plank has a story of its own. When you browse the blog posts of gadgets, you’ll find out 🙂
LikeLike
Absolutely my pleasure! I hope this is helpful and practical information for your readers! I’m always willing to do my part to spread this our fantastic sauna culture. Löyly is a friend!
LikeLike
Thanks a lot for your articles!
I have just finished assembling my first barrel sauna which I have installed in my basement. The basement room has air intake from outside and an exhaust fan right above the spot where the sauna is located. After reading your articles I decided to add a mechanical ventilation system to my sauna. My question is about placing of the exhaust vent inside the barrel. In my sauna I have a wooden grid floor that is about 1.5″ above the lowest barrel point. I am considering installing the exhaust vent under that grid floor as close to the door frame as I can get. I can cut a hole in the barrel and install a vent, then put the grid floor on top of it. There is enough room under that grid to provide unobstructed air circulation. The rest of my ventilation system is going to be quite similar to yours. What do you think about that location? Will it work? Please comment when you have a chance. Thank you.
LikeLike
I’m not an expert in this, but I _think_ it will work. In fact, this was one scenario that was tested in this study in Finland: https://publications.vtt.fi/pdf/tiedotteet/1992/T1431.pdf
If you are not fluent in Finnish, here are some main pointers: page 20, diagram 11 shows the heat stratification when the exhaust is 50 mm from the floor and diagram 12 shows the same if the exhaust is under the bench (which is considered the ideal location). The solid line T4 in both diagram shows the scenario where inlet is between the ceiling and the top of the stove. There is some difference, but not significant difference IMO.
I was thinking that location myself as well, but I abandoned the idea for two reason:
1. Running the duct from below the door outside the sauna is not visually very nice idea
2. I was afraid of adding too much draft on the floor level. This was just based on what I think that would happen and not tested in practice.
LikeLiked by 1 person
Thank you for your comments! Diagrams are quite interested, I wish I could read Finnish. -:))
Anyway, I will most likely follow the way you did ventilation in your sauna. If that works for you, shall do for me as well. And you are right, it is going to look nicer too.
I have ordered three RuuviTag sensors, two adjustable Vevor fans (https://www.vevor.ca/inline-duct-fan-c_11974/vevor-4-inch-inline-duct-fan-hvac-exhaust-blower-kit-ec-variable-speed-control-p_010532060135) and some duct/vents. Will see how the system is about to work in my basement.
Thanks again for your blog and for getting back to me so quickly! Happy Löyly!
LikeLiked by 1 person
Hi,
Very good test – thanks!
I’m new to saunas and trying to choose between a barrel and cabin. The barrel has many practical advantages for us including cost and build time and lots of barrel kits available.
There is the problem your ventilation improvement addresses of temperature stratification. It seems like the mechanical ventilation you use improves but does not eliminate the problem.
I am wondering why it would not work to have a vertical duct(s) that go from the ceiling area down to the foot area with an inline fan. The idea being just to move the hot air up at the ceiling down to the feet. Is this a dumb idea?
Thanks Gary
I
LikeLike
Fan moving air from the ceiling towards the floor works for reducing heat stratification as such. Just be mindful of a few things:
– The fans get hot in the ceiling. Not sure, how long they would last although there are probably some solutions that can withstand more heat
– It might feel uncomfortable to you when the hot air is blown from the ceiling towards you 🙂
The main reasons why I implemented this inexpensive ventilation system the way I did was:
– Air quality is generally quite bad in saunas that rely on pressure-based ventilation (inlet on the floor, outlet high up on the wall – circulation is based on the hotter/lighter air escaping from the ceiling and the colder/heavier air is sucked in below the stove). You might not get enough fresh air in and then in a small barrel sauna, the air is quickly filled with carbon dioxide as you sweat and exhale. By bringing fresh air from the outside and above the stove ensures that the carbon dioxide rich air is pushed out quicker and replaced with cleaner air. This is a great article about the topic: https://saunologia.fi/saunan-ilmanlaatu-happi-hiilidioksidi-ionit/# (translate to English with Chrome/Edge)
– Those fans I used are inexpensive and can be placed outside the sauna so they won’t overheat
– I was able to implement a solution where fresh air is brought in ~3ft above the stove so the fresh (cold) air gets mixed nicely when you pour water on the stove. I got this idea from this study: https://publications.vtt.fi/pdf/tiedotteet/1992/T1431.pdf (in Finnish, unfortunately)
LikeLike